InfiniTime Escort allows the user to build a customized window with everyday tasks available at your fingertips in one place. An unlimited number of escort windows can be configured making it possible for each employee to have a customized portal to the InfiniTime Software Application if desired. In most cases, customers who choose to implement Escort will create one Escort Window for each set of employees responsible for specific tasks.
Escort....
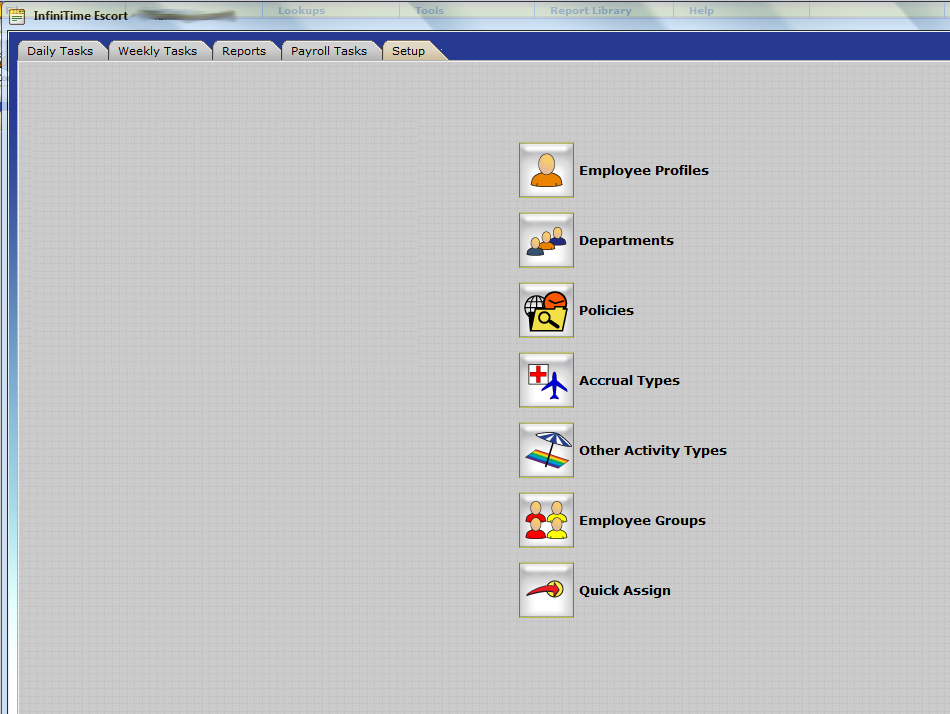
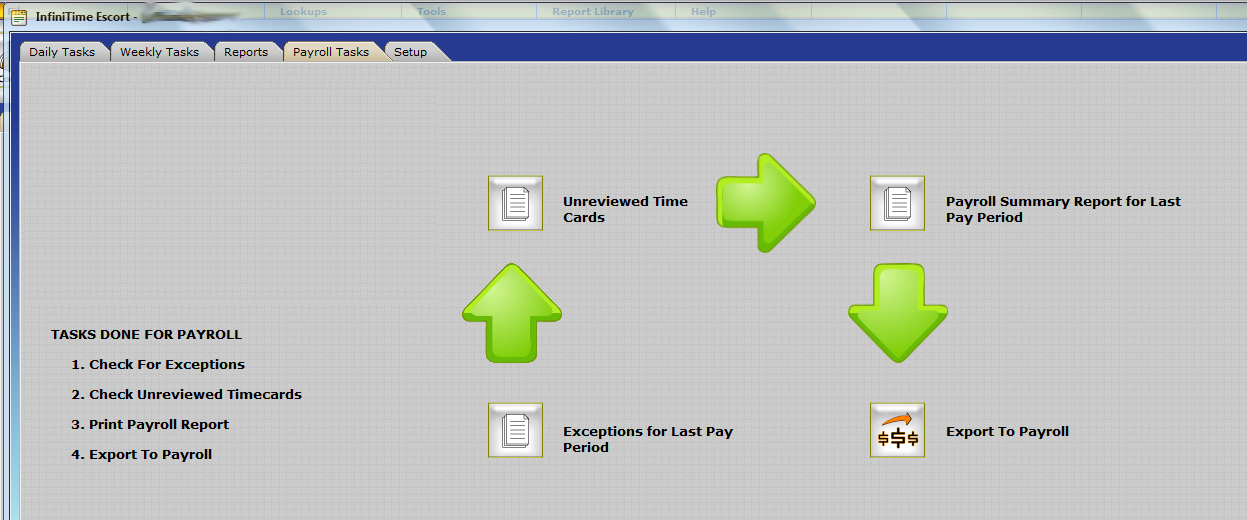
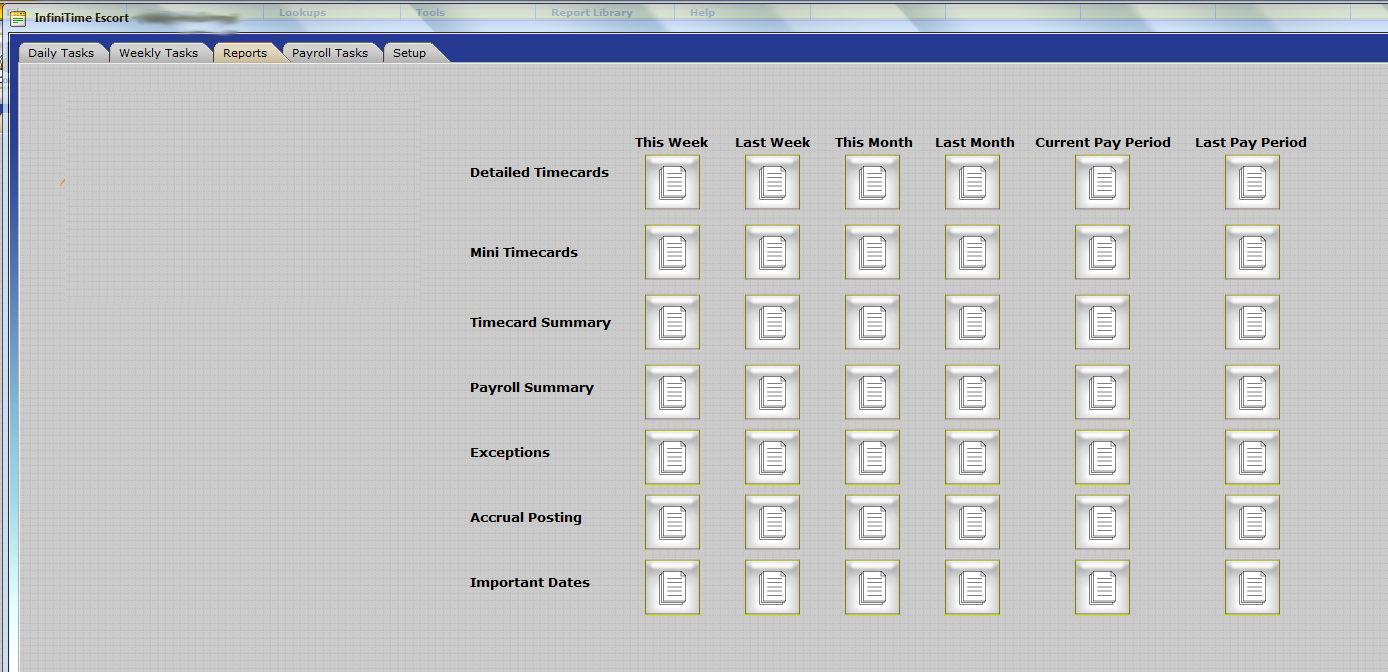
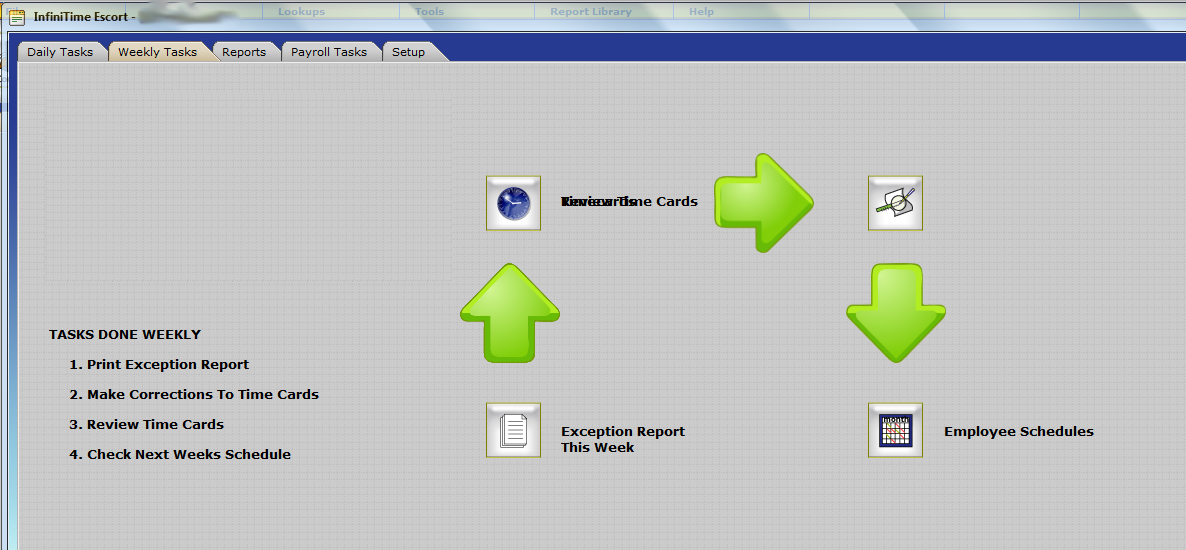
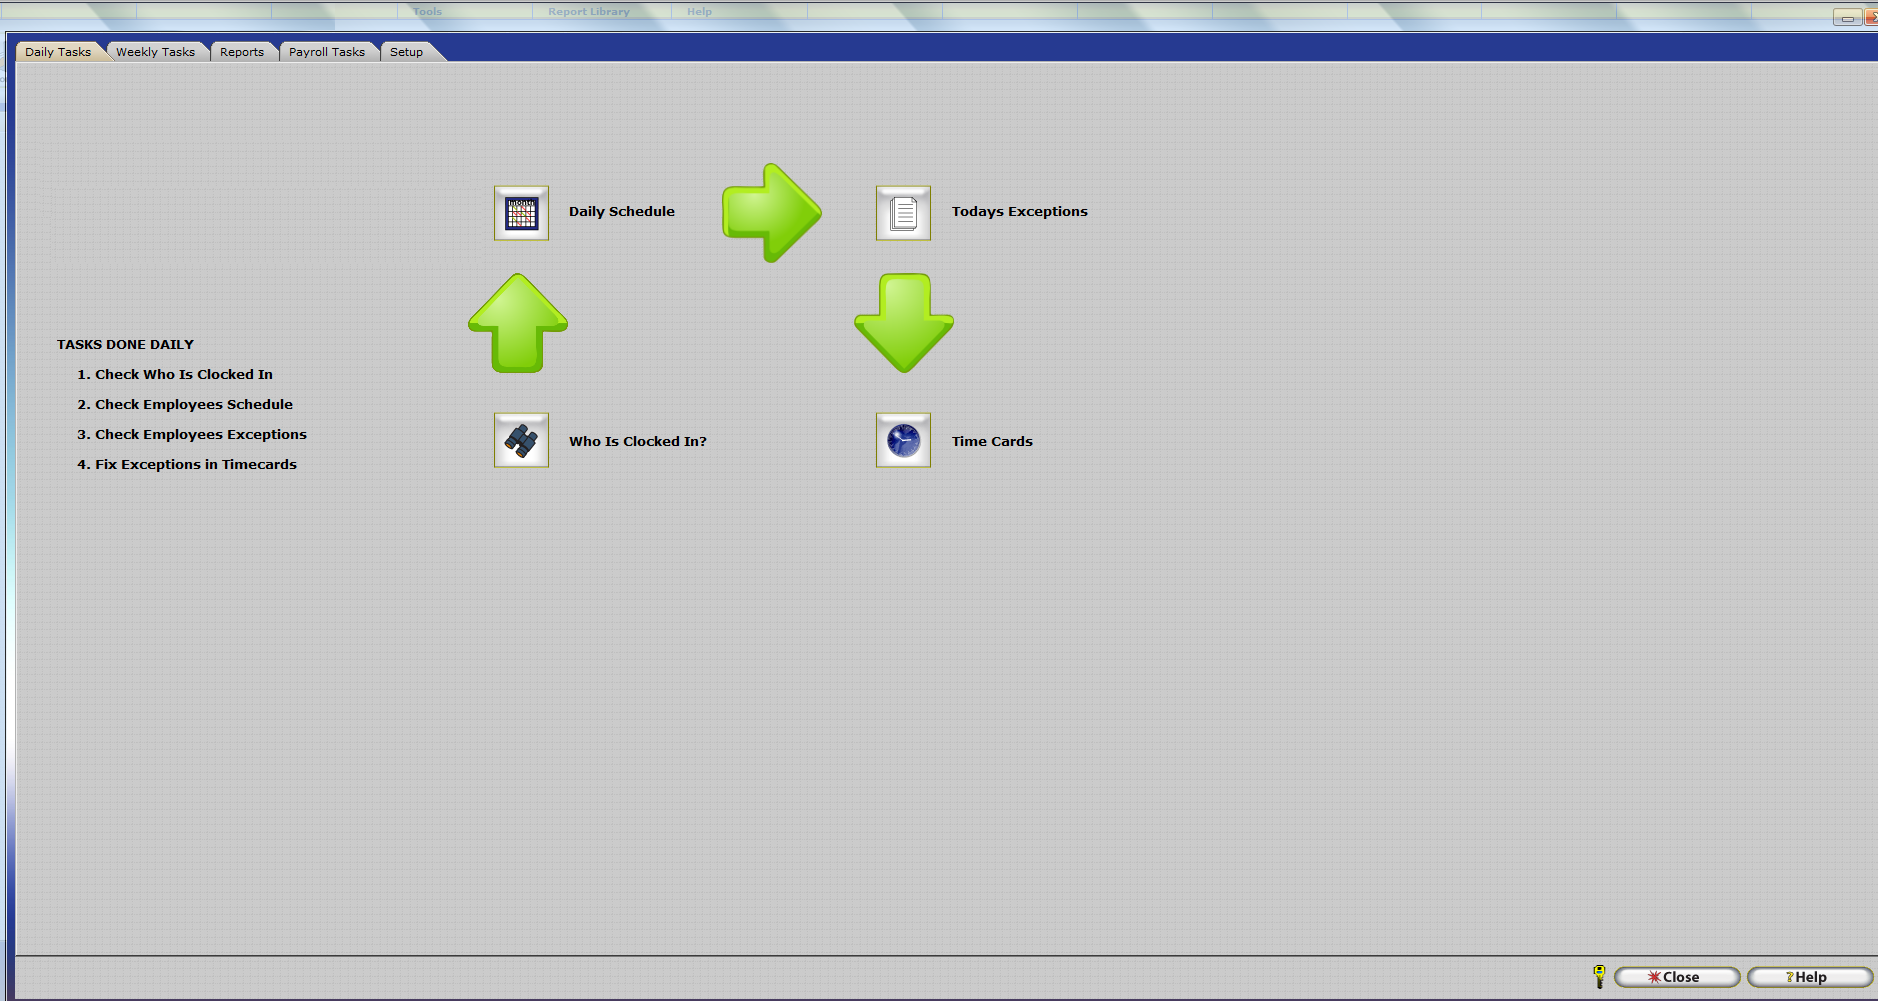
For example, using Escort Windows with clip art images and text labels can create a guided work flow for Daily Tasks, Weekly Tasks, and even Monthly or tasks related to a specific function such as Processing Payroll. An example Escort Window is provided below.
Login to the Manager Module
Click on Lookups.
Click on Employee Setup.
Click on Escort Settings.
The Escort Settings Description Table will be displayed as shown below.
.gif)
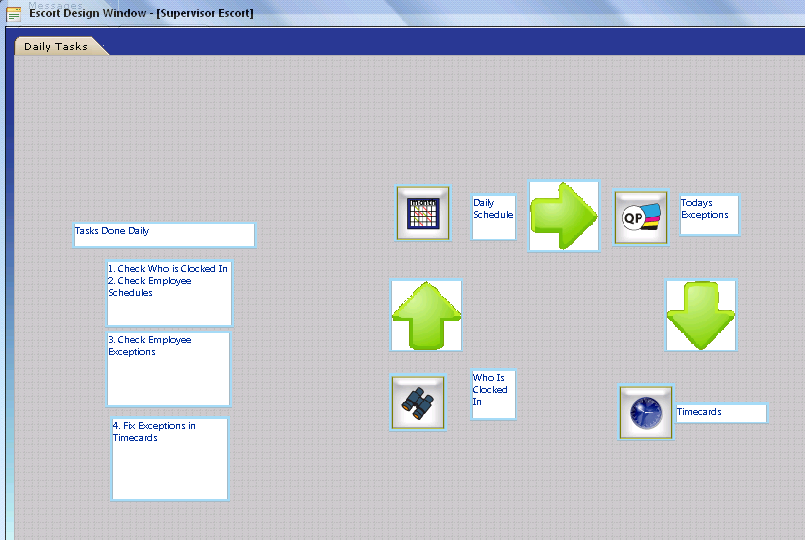
Design - Opens the Escort Design Window for the selected Escort Window. In order to add buttons, labels, images, and tabs for an Escort Setting Description using the Escort Design Window an escort Setting Description must first be created using the Insert Button.
Test - Opens the selected Escort Window for use and / or test purposes. All controls previously added to the Escort using the Escort Design Window will be active and available for use.
Insert - Opens the Escort Setting Description Update Form. Used to create a new Escort Setting Description which can then be altered using the Escort Design Window.
Change - Opens the Escort Setting Description Update Form for the Selected Escort. The user may then alter the Escort Description and first Tab Text as desired. The Escort Description is used to assign the Escort Window to individual employees.
Delete - Deletes the selected Escort. InfiniTime will not permit an escort window to be deleted if it is assigned to one or more employees.
.gif)
Escort Windows must be designed before they can be assigned to or utilized by employees. When designing Escort Windows, it is important to keep an employee's role within the InfiniTime Software in mind. For example, managers will need access to their employee’s Timecards and information as well as reports.
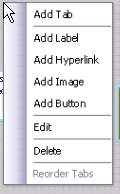
A gray bar separates escort Design Action sets. Each set of actions performs related functions such as altering existing controls or adding new controls to the Escort Window. The Escort Design Actions Right Click Menu can be access by right clicking anywhere on the Escort Design Window.
Add Tab – Displays the Escort Tab Update Form. Each tab provides a blank interface for the user to customize. Tabs are generally used to separate items on the escort into categories such as Reports and Software Access.
.gif)
Tab Label: Enter a Label for the Tab. This label will be displayed on the form as shown below.
.gif)
Add Label – Adds a label to the specified tab. Used to label buttons, hyperlinks, or images.
.gif)
Selected Tab: Specify the tab the label will be created on.
Control Text: Type the text the label will display.
Width: Enter a width, in pixels, for the label.
Height: Enter a height, in pixels, for the label.
Note: A good rule of thumb is to allow ten (10) pixels for each character of text, including spaces. Multiple Lines require additional height, while each character requires additional width.
Add Hyperlink – Adds a hyperlink to the specified tab. Used to link to a web site, ftp site, or file.
.gif)
Selected Tab: Specify the tab the hyperlink will be created on.
Control Text: Type the text the hyperlink will display.
Hyperlink: Type the hyperlink itself.
Width: Enter a width, in pixels, for the hyperlink.
Height: Enter a height, in pixels, for the hyperlink.
Note: A good rule of thumb is to allow ten (10) pixels for each character of text, including spaces. Multiple Lines require additional height, while each character requires additional width.
Add Image – Adds an image to the specified tab.
.gif)
Selected Tab: Specify the tab the selected image will be placed on.
Image Name: Use the magnify glass to open the File Selection Window. Browse to the image you wish to insert.
Width: Enter a width for the image. The Image will automatically be resized.
Height: Enter a height for the image. The Image will automatically be resized.
Add Button – Adds a button to the specified tab.
.gif)
Selected Tab: Specify the tab the button will be placed on.
Button Description: Use the magnify glass to display the Escort Settings Button Description Table. Buttons are used to open specific window.
The following buttons are available:
| Access Control Group Table |
| Access Control Log Table |
| Accrual Types Table |
| Activity Job Table |
| Activity Task Table |
| Backup / Restore |
| Benefit Plan Costs Table |
| Benefit Plan Types Table |
| Cell Phone Providers Table |
| Company Information |
| Company Timecard Database Table |
| Department Table |
| Employee Messages |
| Employee Personal Information Update Form |
| Employee Quick Punch Other Activity |
| Employee Schedule Window |
| Employee Status Table |
| Employee Table |
| Equal Employment Opportunity Table |
| Escort Settings Description Table |
| Exception Table |
| Export Definition Table |
| Group Table |
| Holiday Schedule Types Table |
| Import Definition Table |
| In & Out Board |
| Message Database Update Form |
| Other Activity Types Table |
| Payroll Export Table |
| Policy Table |
| Polled Information Table |
| Print Saved Report Selection Criteria |
| Process Selected Payroll Export |
| Punch Information Window |
| Purge History Table |
| Quick Assign Table |
| Quick Print Report |
| Quick Punch History Table |
| Reader Configuration Table |
| Report Library |
| Schedule Availability Table |
| Schedule Change Request Update From |
| Schedule Skeletons Table |
| Security Roles Table |
| Shift Table |
| Supervisor Quick Punch Other Activity |
| Supervisor Review History Table |
| System Monitor |
| Termination Reason Table |
| Time Off Request Update Form |
| Trained Task Table |
| Unassigned Punches Table |
| User Defined Fields Table |
| Worker Compensation Code Table |
Width: Enter a width for the button. The Image will automatically be resized.
Height: Enter a width for the button. The Image will automatically be resized.
Edit – Opens the Update form for a specific object. If you wanted to edit a label for example, right click on it then click Edit.
Delete - Deletes a specific object. If you wanted to delete a label for example, right click on it then click Delete.
Reorder Tabs – Provides the ability to reorder previously created tabs. This option is only available when three or more tabs exist. If only two tabs exist clicking on this option will not open the Escort Settings Tab Description Table as shown below.
To Reorder Tabs simply select the tab you would like to move and use the move up and down buttons to alter the order tabs appear in.
The test feature makes it easy for the InfiniTime Administrator to view and test previously configured Escort Window Settings. Simply highlight the escort setting you wish to view and click on the test button. The Escort Window will be displayed and will function exactly as if an employee assigned to it had signed into the Escort Module.
Logging Into the Escort Module
Refer to the Client Access Section of the Installation Manual for instructions on accessing the InfiniTime Escort Module. At the Escort Module Login Window, employees may simply use their login ID and Password to access the Escort Module. The Escort Window assigned to the employee will then be displayed.
Assigning an Escort Window to a single Employee
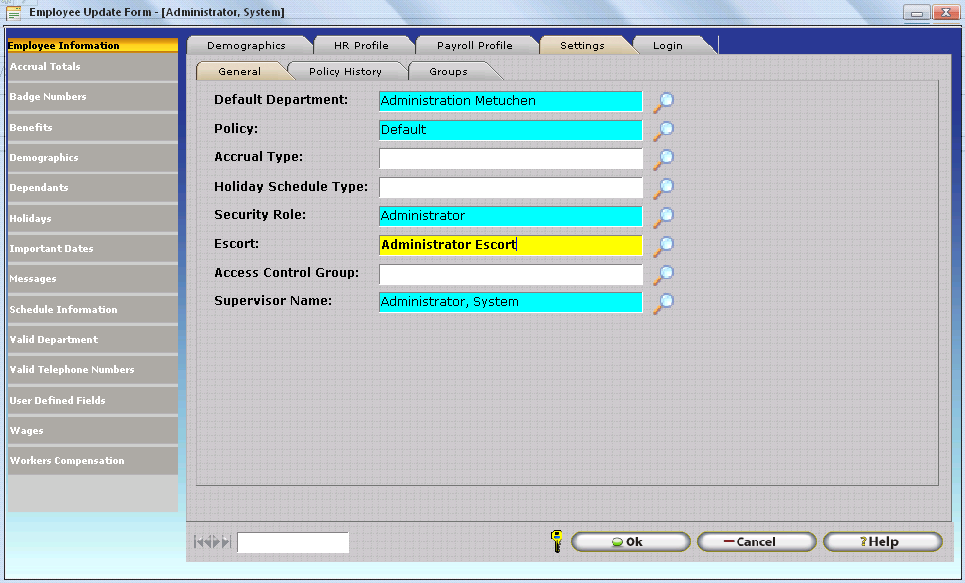
Escort Windows can be assigned to employees on the Settings Tab of the Demographics Section on the Employee Update Form. Instructions for assigning an escort window to an employee are provided below.
1. Login to the InfiniTime Manager Module as an Administrator, Payroll Clerk, or Supervisor with the ability to edit Employees
2. Open the Employee Table

3. Search for the employee you wish to assign an Escort Window to and click on their name to Highlight them
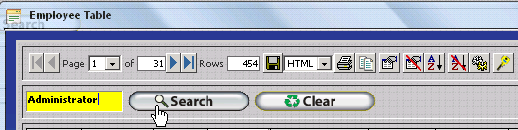
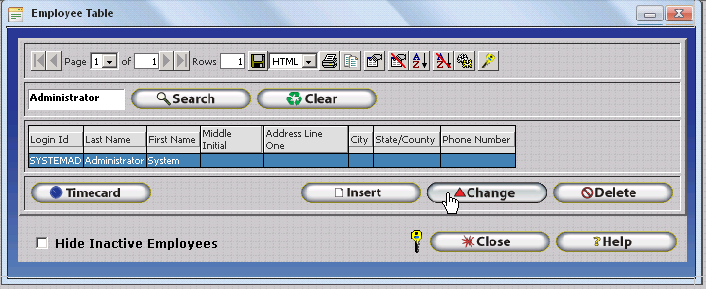
4. Click on Change. The Employee Update Form will be displayed.

5. Click on the Settings Tab.
6. Notice the Escort Field. Enter the Description of the Escort Window you wish to assign to the employee in this field then click OK to save the changes.
7. Alternatively Quick Assign may be used to assign Escort Windows to multiple employees at once. Additional Details on the use of Quick Assign can be found in the Quick Assign Section of this document.
In order to reduce design time and make it possible to transfer previously designed Escort Windows from Installation to Installation, Escort Windows can now be exported from the InfiniTime Application. Upon export, Escort Windows are saved to a file with an extension of .ESB which can be shared between InfiniTime Users and imported into the InfiniTime Application. The Import and Export features for Escort have some limitations as listed below:
Escort Windows can only be exported from the InfiniTime Server. The Export Button is not displayed on the Escort Settings Description Table when InfiniTime is accessed remotely, or if Trusted Sites and Active X Controls are not configured properly when InfiniTime is accessed from the InfiniTime Server.
Escort Windows can only be exported using Internet Explorer 7 and later. Safari and Mozilla Firefox do not support this feature.
Auto Report Schedules associated with a Printer are not transferred by the Export feature. Individual Printers are installation specific, for this reason this information cannot be transferred from machine to machine.
Only InfiniTime Version 7.06b and later provides support for importing user created escorts in the form of .ESB files. Customer's must update to InfiniTime 7.06b or later in order to Import Escort Windows.
To Export an Existing Escort Window:
Verify Trusted Sites and Active X Controls are configured properly on the InfiniTime Server. InfiniTime must have access to the local registry using ActiveX controls. If the registry cannot be accessed the Export and Import Buttons will not be displayed.
Login to the Manager Module on the InfiniTime Server using Internet Explorer.
Click on Lookups - Employee Setup - Escort Settings.
Click on the Escort you wish to export to Highlight it.

Click Export.
![]()
The Export Escort Window will be displayed followed by a Dos Screen while the export is performed.
Save the resulting .ESB file. Your Internet Browser may prevent the file from downloading automatically. If so, right click on the warning box and select Download File as shown below.
EscortSubmission@InfiniTime.com
In order to reduce design time and make it possible to transfer previously designed Escort Windows from Installation to Installation Escort Windows can now be imported into the InfiniTime Application. Escort Windows are saved to a file with an extension of .ESB which can be shared between InfiniTime Users and imported into the InfiniTime Application. The Import and Export features for Escort have some limitations as listed below:
Escort Windows can only be imported from the InfiniTime Server. The Import Button is not displayed on the Escort Settings Description Table when InfiniTime is accessed remotely, or if Trusted Sites and Active X Controls are not configured properly when InfiniTime is accessed from the InfiniTime Server.
Escort Windows can only be imported using Internet Explorer 7 and later. Safari and Mozilla Firefox do not support this feature.
Auto Report Schedules associated with a Printer are not transferred by the Export feature. Individual Printers are installation specific and cannot be transferred from machine to machine.
Only InfiniTime Version 7.06b and later provides support for importing user created escorts in the form of .ESB files. Customer's must update to InfiniTime 7.06b or later in order to Import Escort Windows.
Some escort buttons are linked to other features of the application. A detailed description of how these buttons and their linked features are handled is provided below.
Print Saved Report Selection Criteria - The Print Saved Report Selection Criteria Button allows users to print a specific saved report. When escort windows are exported Saved Reports attached to buttons on the escort window are also exported. A copy of the original saved reports will be imported with the escort, including settings on the General Tab, Email Tab, Options Tab, and Auto Report Schedule. Selection Criteria settings are database specific and must be reconfigured after importing an Escort and associated Saved Reports.
Process Selected Payroll Export - The Process Selected Payroll Export Button allows users to print a specific payroll export. When escort windows are exported Payroll Exports attached to buttons on the escort window are also exported. A copy of the original saved payroll export will be imported with the escort, including settings on the General, Payroll Codes, Email, Auto Export Schedules, and Options tabs. Employee Filter settings are database specific and must be reconfigured after importing an Escort and associated Saved Payroll Exports.
To Import an Escort Window (.ESB File):
Verify Trusted Sites and Active X Controls are configured properly on the InfiniTime Server. InfiniTime must have access to the local registry using ActiveX controls. If the registry cannot be accessed the Export and Import Buttons will not be displayed.
Login to the Manager Module on the InfiniTime Server using Internet Explorer.
Click on Lookups - Employee Setup - Escort Settings.
Click the Import Button.
![]()
Click on the Browse Button and locate the escort file you would like to import.
Click OK to import the selected escort file. The Import Escort Window will display while InfiniTime prepares to import the escort file.
After preparations are complete a command prompt will display while the escort data is imported to the InfiniTime Database.
A copy of the original escort will now be available in the Escort Settings Description Table. The escort window is now ready for use.
Within the Escort Module, software access is limited by the design of an employee’s escort window. Employees will only be able to access parts of the software that correspond to buttons on their assigned escort window. Once an employee has opened a window, for example the Timecard Table, their access is further limited by the employee’s security role and its configuration. In many situations it may be desirable to configure additional security roles for escort employees in order to further define access rights within the InfiniTime Software. Refer to the Security Section of this document for more information about configuring InfiniTime security settings.
Employees generally have little to no access to the InfiniTime software. Escort would generally be used to grant very limited access, as controlled by security role configuration and security filters, to the following items:
Employee Table
Timecard Activity Table
In & Out Board
Supervisors, or those in charge of a group of employees, require additional access to the InfiniTime software based upon the duties assigned to them. In some cases all timecard activity will be edited and approved by supervisors, while in other cases the software administrator or payroll clerks may take over this duty. In general, supervisors require access to the following items:
Software Access:
Employee Table
Company Activity Table
Department Table
Schedule Table
Report Library
In & Out Board
Reporting Functions:
Exception Detail
Timecard Detail
Timecard Summary
In & Out Board
Postable Schedule
Payroll clerks, similar to managers, require additional access to the InfiniTime software based upon the duties assigned to them. Payroll Clerks work with all employee activity, including their own in some cases. In general, access to the following items is required for Payroll Clerks:
Employee Table
Timecard Table
Report Library
In & Out Board
Payroll Export Table
Other Activity Types Table
Software administrators generally require access to nearly every facet of the software. All items available within the escort module will be of use at one point or another for the software administrator. Generally, the administrator will use the Manager Module itself for software configuration and access purposes. Should the administrator choose to configure an escort window for their use, all items, as listed in the Escort Settings section of this document, will be of use at one point or another. Personal preference will be a part of designing an administrator’s escort window, as they will always have access to the manager module if needed.