
The InfiniTime Time and Attendance Web Application includes a complete security suite with features beyond conventional login and password requirements in order to provide increased protection for sensitive employee information. Features such as Human Verification, Password Expiration, and increased password manageability, have been included in the InfiniTime Software Application in order to deter unauthorized access and safeguard sensitive information. In addition to these general security features, InfiniTime includes a role based security system which permits Software Administrators to control access to both specific sections of the InfiniTime Software as well as individual buttons and fields available on screen for the respective window or form. A complete list of general security features offered by the InfiniTime Security Suite is provided below.
Security Feature Overview:
Create a customized software interface for specific user groups.
Limit exposure to the InfiniTime User Interface for non-technical users and / or individuals with minimal computing skills through use of a customized software interface.
InfiniTime includes several general security features as outlined below. Each of which are optional and can be enabled at the discretion of the InfiniTime Software Administrator.
A CAPTCHA is integrated into the InfiniTime Login Window in order to secure against unauthorized access by automated scripts. A CAPTCHA can be defined as a software program which generates tests that cannot be passed by current computers but can be passed by humans. During the login process, enter your Login ID and Password as usual. Then enter the characters displayed in the CAPTCHA image into the Validation Code field. Ignore any lines or dots on the image. Once all information has been entered click OK to access the InfiniTime Software.
InfiniTime automatically tracks the time since an employee was inserted or since they last changed their password and prompts the user to change their password after a specified amount of days have passed. Once an employee's password has expired they will be prompted to change their current password, as shown below, upon their next login attempt.
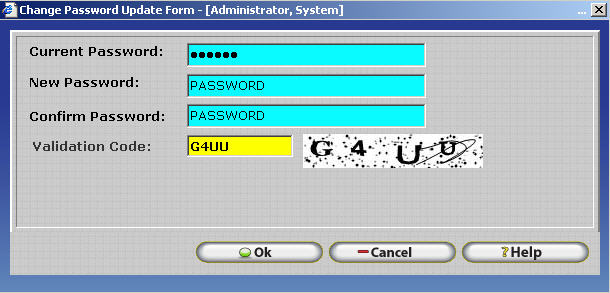
The Employee will be prompted for their current and desired password. A CAPTCHA will also be displayed at the bottom of the screen to prevent automated scripts from abusing the change password feature. Simply ignore the random dots and lines in the image and enter the characters that are displayed. Once all information has been entered click OK to change the password and access the InfiniTime Software.
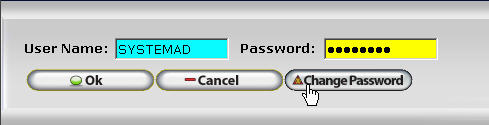
InfiniTime provides the ability for employees to change their own passwords as desired in order to increase security. This is accomplished by using the Change Password button which is available on the login screen for all modules. Through the use of the change password button it is also possible to assign a generic password during the initial configuration of employees, and then allow each employee to set their own password as desired when they first login.
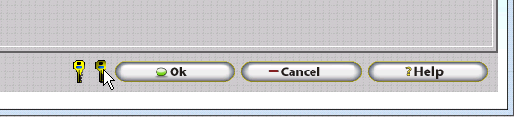
To utilize the Change Password Button simply open the Login Window for any InfiniTime Software Module, enter your current login information, and click on the Change Password Button as shown below.
A second screen will be displayed prompting the user for their current password and the desired password. A CAPTCHA will also be displayed at the bottom of the screen to prevent automated scripts from abusing the change password feature. Simply ignore the random dots and lines in the image and enter the characters that are displayed. Once all information has been entered click OK to change your password and access the InfiniTime Software.
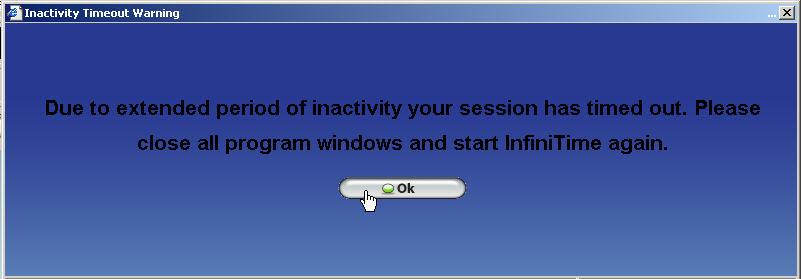
Opening a new window, closing a window, or performing an action such as inserting a punch. This feature helps secure management terminals in a workplace that might be accessible to employees should the manager step away for a short period. Once the predetermined period of time has elapsed the user will be logged out of the software and will be unable to continue working in the software until they login again. The message below will be displayed if the user attempts to perform another action after the session has been terminated.
To configure the Inactivity Time-out Setting click on the Company button of the Manager Module's Toolbar as shown below.

Locate the Inactivity Time-out setting at the bottom of the form and set the time-out period as desired.
![]()
Security Roles make it possible to define the actions an employee may perform after logging into the software. Security roles provide options for configuring access to specific windows and individual buttons. This makes it possible to completely lock employees out of sections of the software or allow access and disable certain functions. The InfiniTime Software application includes four default security roles: Administrator, Payroll Clerk, Supervisor, and Employee. The Administrator role is suitable for administrative employees only as it provides access to the entire software application. The Administrator role cannot be edited, which makes it impossible to accidentally lock an administrator out of the software when configuring security. The Payroll Clerk Role begins with the same configuration as the Administrator role with one exception. The Payroll Clerk Security Role can be edited to further limit what may be accessed by the user. The Supervisor Role begins with view only access to the entire software application and may be edited to grant additional permissions to supervisors. The Employee Role begins with highly limited software access and may be edited to grant additional permissions to employees if desired. By default, even if a user assigned to the Employee Security Role were to login to the Manager Module they would be unable to access any information. Employees are able to access the Employee Module and InfiniTime Punch Modules.

![]() Copies the Highlighted Security Role.
Security Configuration is also duplicated through a Class System which
designates the default security permissions associated with a security
role. Refer to Security Role Classes below for more information on the
Class System.
Copies the Highlighted Security Role.
Security Configuration is also duplicated through a Class System which
designates the default security permissions associated with a security
role. Refer to Security Role Classes below for more information on the
Class System.
![]() Opens the Security Role Update Form,
permitting the user to add a new security role.
Opens the Security Role Update Form,
permitting the user to add a new security role.
 Opens the Security Role Update Form for the selected
Security Role, permitting the user to adjust Security Settings for the
selected Security Role. This option is only available for the Employee,
Payroll Clerk, Supervisor, and User Created Security Roles.
Opens the Security Role Update Form for the selected
Security Role, permitting the user to adjust Security Settings for the
selected Security Role. This option is only available for the Employee,
Payroll Clerk, Supervisor, and User Created Security Roles.
The Security Role Update Form is used to insert a new Security Role or edit existing security roles.
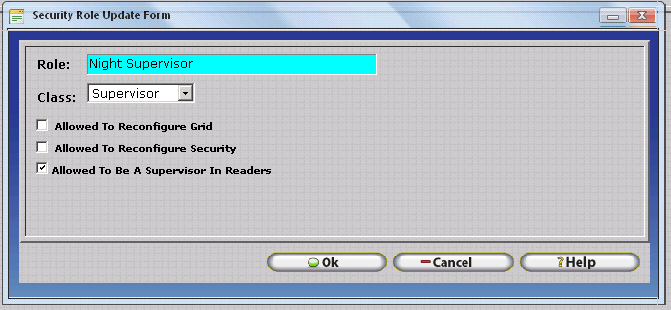
Role - Enter a Short Description of the Security Role Here. Generally, Employee Positions are used as the description for Security Roles.
Class - Select the default behavior of the security role.
Allowed to Reconfigure Grid - If this option is checked, all employees assigned the to the security role will have the ability to edit Grid Configuration and related options throughout the InfiniTime application. This option is checked by default for the Administrator and Payroll Clerk Roles.
Allowed to Reconfigure Security - If this option is checked, all employees assigned the to the security role will have the ability to edit Security Configuration and related options throughout the InfiniTime application. This option is checked by default for the Administrator and Payroll Clerk Roles.
Allowed to Be A Supervisor in Readers - If this option is checked, all employees assigned to the security role will have the ability to enroll employees within Hardware Time and Attendance Terminals such as the Scout. This option is checked by default for the Administrator and Payroll Clerk Roles.
![]() Returns all security configuration settings
for the highlighted security role to the default settings as described
in this document.
Returns all security configuration settings
for the highlighted security role to the default settings as described
in this document.
Security Roles have three innate properties, Grid Reconfiguration Rights, Security Editing Rights, and Supervisor in Readers . By default, Rights to Reconfigure the Grid and Edit Security are only granted to the Administrator Security Role. Supervisor in Readers is granted to all roles except for employees. Grid Reconfiguration Rights provide employees with the ability to configure the grid, while Security Editing rights permit employees to edit security roles and grid security. Supervisor In Readers allows employees to enter the management menu and enroll employees on Hardware Readers such as the Scout and Zephyr.
Four security roles are configured by default and cannot be deleted. Details for these security roles and their default settings can be found below.
Administrator: The administrator security role includes complete privileges to the software. Employees assigned to this role can edit software security and configure the grid. Employees assigned to the administrator security role have complete access to the InfiniTime software. The administrator security role cannot be edited.
Payroll Clerk: The payroll clerk security role includes complete privileges to the software. By default, employees assigned to this role have complete access to the InfiniTime software. Unlike the employee’s assigned to the administrator role, those assigned to the Payroll Clerk security role do not have the ability to edit software security or configure the grid. Security permissions granted by the payroll clerk security role can also be edited to suit the users needs.
Supervisor: The supervisor security role is intended for employee managers. Employee’s assigned to the supervisor role have the ability to view all information within InfiniTime though, by default, they are unable to alter information within the software. Supervisors are unable to edit software security or configure the grid.
Employee: The employee security role is intended for employees. Employees assigned to this role have minimal software access from within the Manager Module and are only able to view their own information via the Employee Module. Employees are unable to edit software security or configure the grid.
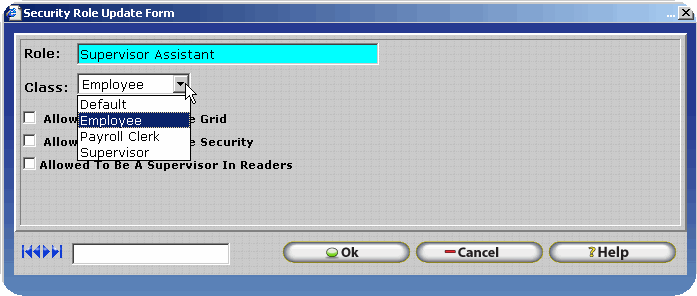
Security Roles are assigned classes in order to designate default settings for the security role. Before the implementation of a class system for Security Roles it was often difficult for the user to establish what general security access level (IE: Administrator, Employee, Payroll Clerk, or Supervisor) was associated with a user created Security Role. By default a security role with the Employee class has the same permissions as the Employee Role for all windows in the software. The security role can then be edited using Security Keys throughout the InfiniTime application as desired in order to grant access to other items within the software. The same logic can be applied to a security role with the Payroll Clerk Class. Since the Payroll Clerk Class is assigned to it, the security role will have the same permissions as the Payroll Clerk security role by default. The security role can then be edited using Security Keys throughout the InfiniTime application in order to restrict access to certain parts of the software.
Security Keys are present on each window throughout the InfiniTime Application and provide the InfiniTime Administrator with the ability to view and edit security configuration for the respective window. It is important to note that the presentation and display of Security related settings are displayed slightly differently depending upon the type of window the user is accessing. InfiniTime includes three different types of windows as outlined below.
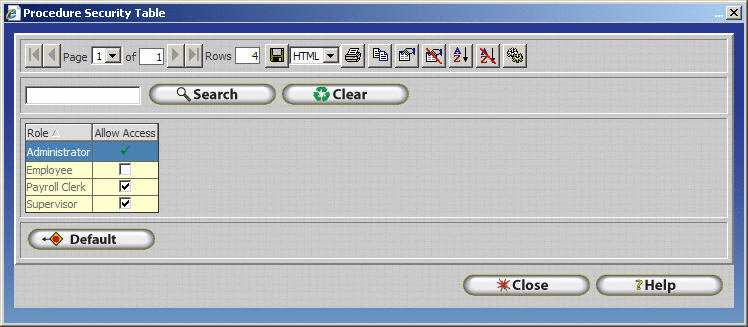
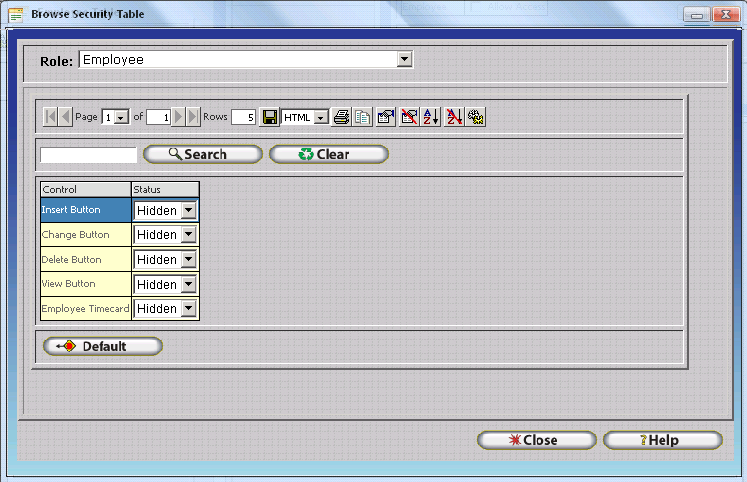
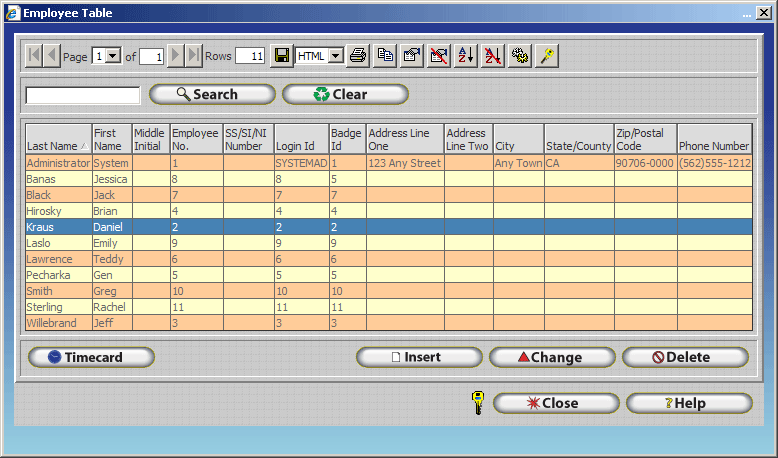
Table Browse Windows - Table Browse Windows include all windows within InfiniTime that list multiple items in a table or grid format. Generally, each section of the InfiniTime Software includes one or more Table Browse Windows. For example, the Employee Table, Department Table, and Policy Table are all examples of Table Browse Windows. Security Options for a specific Table Browse include only a single option - 'Allow Access'. If the 'Allow Access' option is checked for a given security role then all users assigned to the respective role will be able to access the respective Table Browse Window. If the 'Allow Access' option is unchecked for a given security role then all users assigned to the respective role will be denied access to the respective Table Browse Window. Only one Security option exists for Table Browse Windows
Update Form Windows - Update Form Windows include all windows within InfiniTime that are called using the Insert or Change Buttons from a given Table Browse Window. For example, the Employee Update Form, Department Update Form, and Policy Update form are all examples of Update Form Windows. Update Form Windows include multiple tabs - Security, Default, and Required. Though some exceptions exist, each tab generally includes a single option for every field present on the Update Form as well as a single option for every right click menu item present on the respective window (if applicable). The Security Tab allows the InfiniTime Administrator to set the field to Normal, Hidden, or Disabled for each field as explained below. The Default Tab permits the InfiniTime Administrator to set Default Field Values while the Required Tab permits the InfiniTime Administrator to set
Procedure
Security - Procedures include all buttons such as Insert, Change,
View, and Delete in addition to feature specific buttons from the
respective Grid as displayed on individual Table Browse Windows such
as 'Audit Trail' or 'Quick Punch'. Procedure security is accessed
using the Grid Security Key (  ) which is present
on every window with a grid. The Procedure Security Table permits
the InfiniTime Administrator
to enable and / or disable access to specific buttons on a window
by window basis.
) which is present
on every window with a grid. The Procedure Security Table permits
the InfiniTime Administrator
to enable and / or disable access to specific buttons on a window
by window basis.

The Procedure Security Table will be displayed. Security Options for a specific window, browse, and / or table such as the Employee Table, Department Table, Policy Table etc. include only a single option - 'Allow Access' for each security role. If the 'Allow Access' option is checked for a given security role then all users assigned to the respective role will be able to access the respective Table Browse Window. If the 'Allow Access' option is unchecked for a given security role then all users assigned to the respective role will be denied access to the respective Table Browse Window. Notice how the Employee Security Role is denied access to the Employee Table.

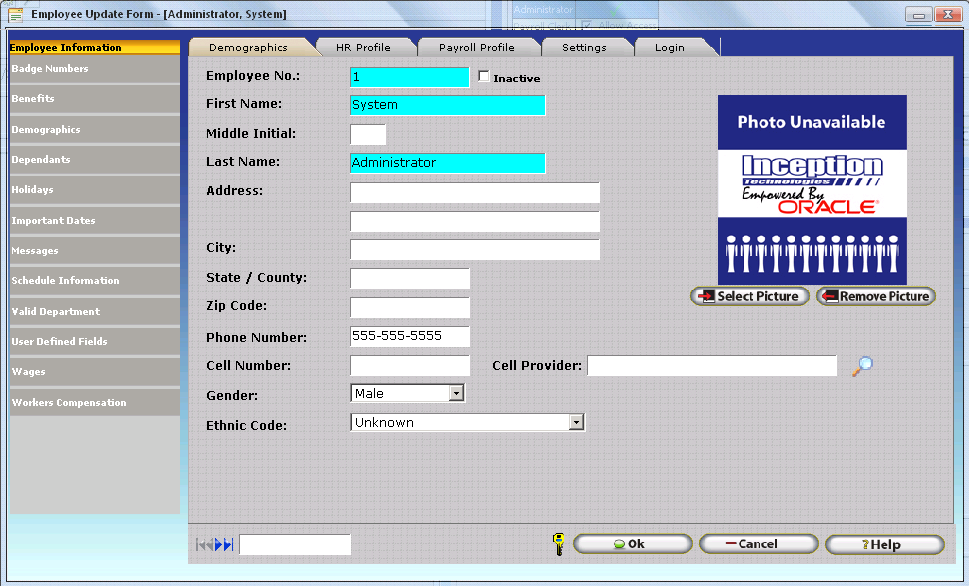

Security: Allows the InfiniTime Administrator to control the state of individual fields on the form. A Field can be in a Normal, Hidden, or Disabled State. Fields set to the Normal state are displayed on the form and can be edited for the respective security role. Fields set to the Hidden state are not displayed on the form and cannot be viewed or edited for the respective security role. Fields set to the Disabled State will be displayed on the form but will not be editable for the respective security role.
Default: Permits InfiniTime Administrators to set Default Field Values. Default Field Values affect all security roles. Additional details can be found below in the Default Values section of this document.
Required: Permits the InfiniTime Administrator to alter the fields which must be entered by the user when creating a new record. Required Field values affect all security roles.
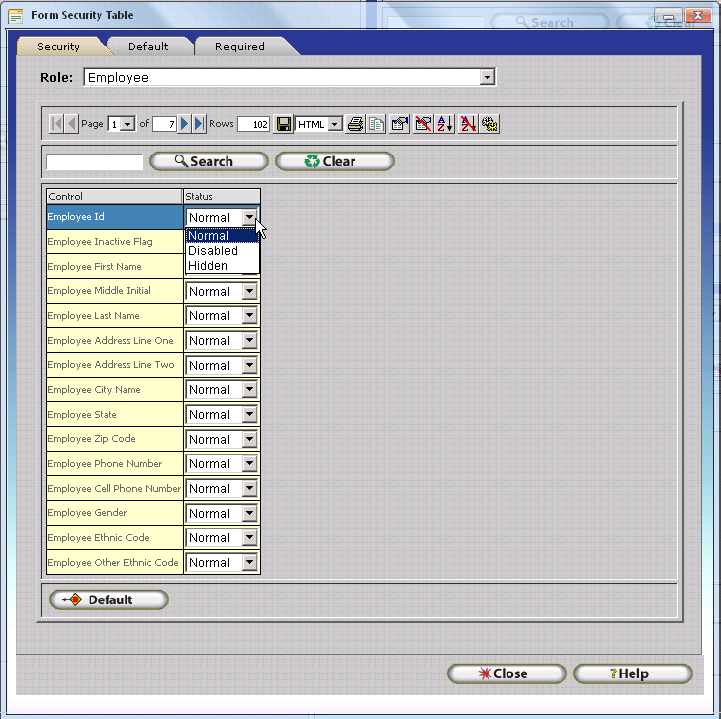
Notice that the Form Security Table has a drop down box on the top of the form listing all available Security Roles. To view or alter security settings for a specific role, first select the role from the Drop Down then adjust the individual field settings as appropriate.
Click Close once all desired settings have been configured.

Click Close once all desired settings have been configured.
Default security settings are saved within the InfiniTime database for each window where security can be configured. To return security configuration to the default settings:
3. Click the Default Button to reset window security settings for the selected security role.
Security Filters control an individual’s access to other employees within the InfiniTime software. Security Filters control the display of employees on each window within the InfiniTime Software where a list of employees is displayed, for example the Timecard Activity Table, Employee Table, Schedule GANNT Chart, and the Report Selection Criteria Settings are subject to Security Filters. In this way, a given user is only permitted access to employees who are included in their security filter.
Stated simply:
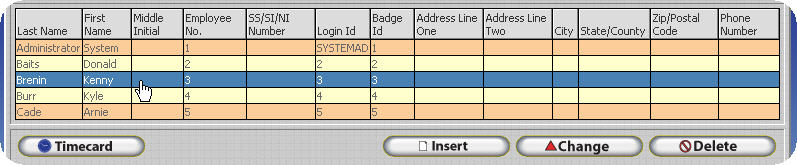
Open the Employee Table.
Open the record that corresponds to the employee you wish to configure.
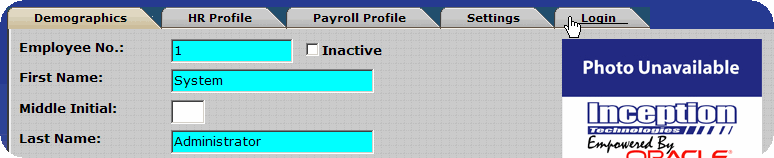
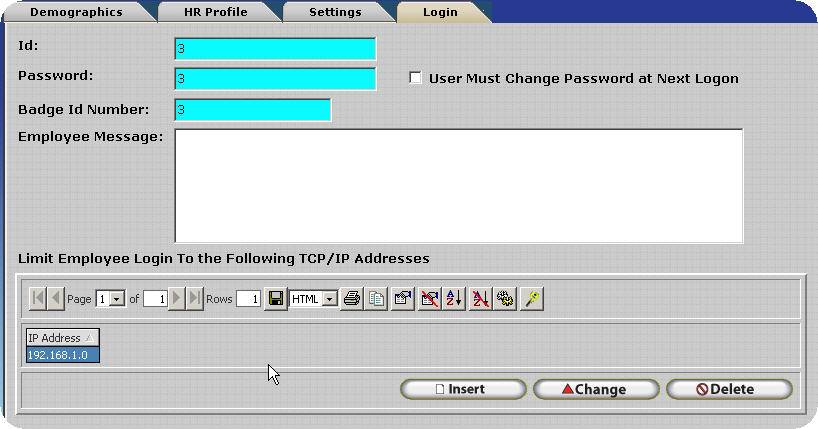
Click on the Login Tab.
Click on the Security Filter button.

The Security Filter Update form will open. Security filters can be configured by employee, department, groups, or range selections such as employee id and pay type. Employees will only be able to access the employees specified within their security filter settings. All employees are accessible by default.
Selected Employees – Change the mode to Selected in order to select individual employees that can be accessed. This is often used to select only the individual, limiting employee access to only his or her own information. Security roles and grid configuration can then be configured in order to restrict the employee’s access to the point that they can only view their information without changing it.
Selected Departments – Change the mode to selected in order to select individual departments that the employee has access to. This grants the ability to access information for all employees within the department. Departments are one of the most common methods for configuring employee security filters.
Selected Groups – Change the mode to selected in order to select individual groups that the employee has access to. This provides the employee with the ability to access information for all employees with the specified group(s). Groups are one of the most common methods for configuring Employee Security Filters.
When utilizing groups for employee filtering it is recommended that a group for 'Unassigned' employees be created for each group level present in the software. All supervisors should have the ability to view the 'Unassigned' Groups. In this way if a supervisor should forget to assign a group when creating an employee the employee will automatically be assigned to the unassigned group. All supervisors will then be able to edit the employee record and assign the employee to the correct group.
If unassigned groups are not used in this fashion the employee would be assigned to the default group which the supervisor inserting employee records may not have access to. If this is the case the supervisor will be unable to edit the newly created employee record until either their security filters are changed or the employee's group is set appropriately.
Range Selections - By default, Range Selection filters are disabled. Additional filter options such as filtering by employee ID, Department Number, Pay Method, or Pay Type are available on the Range Selections tab. Range Selections are rarely used for Security Filter purposes.
Filtering by Employee ID:
Enter the minimum employee ID in the left field.
Enter the maximum employee ID in the right field.
All employees with ID numbers that fall in the above range will be displayed in the corresponding window.
Filtering by Department Number:
Enter the minimum employee ID in the left field.
Enter the maximum employee ID in the right field.
All employees with department numbers that fall in the above range will be displayed in the corresponding window.
Filtering by Pay Type:
Use the interactive selection buttons to select pay type(s) that you wish to view. Only employees with the specified pay type(s) will be displayed. Refer to the Employee Setup section for more information about pay types.
Filtering by Pay Method:
Use the interactive selection buttons to select pay method(s) that you wish to view. Only employees with the specified pay method(s) will be displayed. Refer to the Employee Setup section for more information about pay methods.
As previously introduced, Required Fields permit the InfiniTime Administrator to alter the fields which must be entered by the user when creating a new record. Required Fields are configured on the required Tab of the Form Security Table which can be accessed from the Security Key for most Update Form swithin the InfiniTime Software. It is important to note that certain context sensitive forms such as the Quick Punch Update Form called from the Quick Punch Button in the Company Timecard Table do not permit the user to adjust Required Fields. For these forms, the Required Tab will simply not be displayed on the Form Security Table. Details on how to access and configure Required Fields are outlined below.

All fields on the respective Update Form will be displayed. Notice that fields specifically required by the InfiniTime Application have a required status of 'True' and cannot be changed.
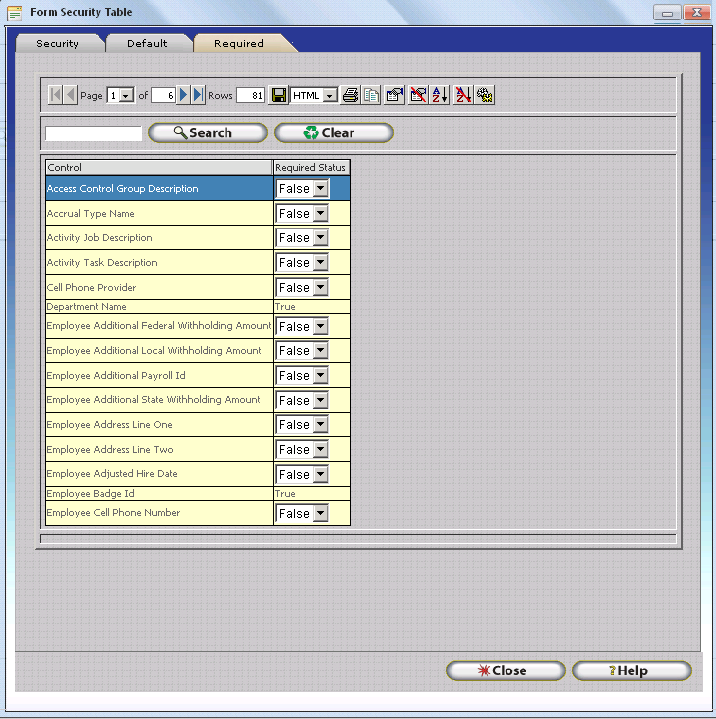
Use the Drop Down options to change Required Field settings as desired, then click the Close Button to save your changes.
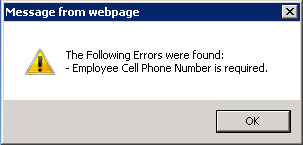
Fields set to a required status of 'True' will now be considered required Fields by the InfiniTime User Interface. Required fields are shaded in blue. A warning will be displayed if the user attempts to save a record with a blank required field.

As previously introduced, Default Values permit the InfiniTime Administrator to set Default Field Values. Default Values are configured on the Default Tab of the Form Security Table which can be accessed from the Security Key for most Update Forms within the InfiniTime Software. It is important to note that certain context sensitive forms such as the Quick Punch Update Form called from the Quick Punch Button in the Company Timecard Table do not permit the user to adjust Default Values. For these forms, the Default Tab will simply not be displayed on the Form Security Table. Details on how to access and configure Default Values are outlined below.
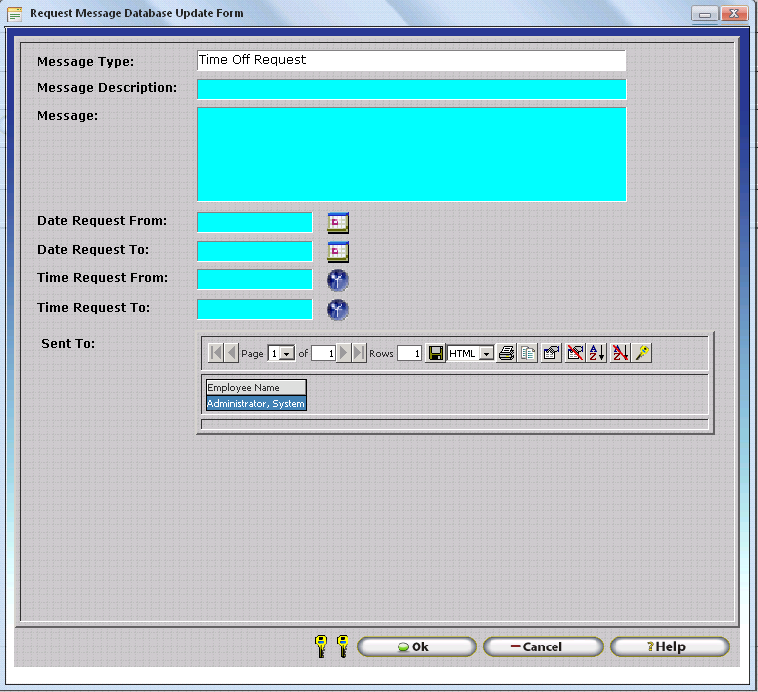

All available fields on the respective Update Form will be displayed.
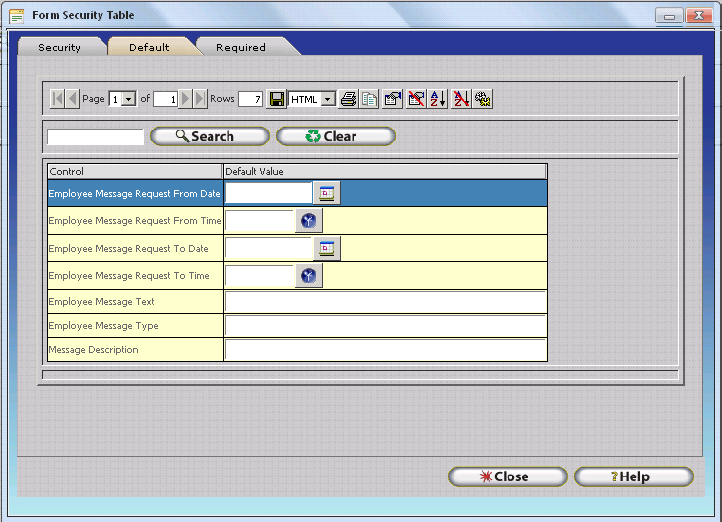
Use the provided controls to change Required Field settings as desired, then click the Close Button to save your changes.
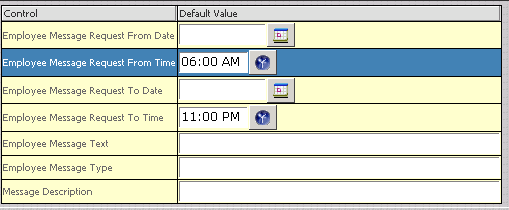
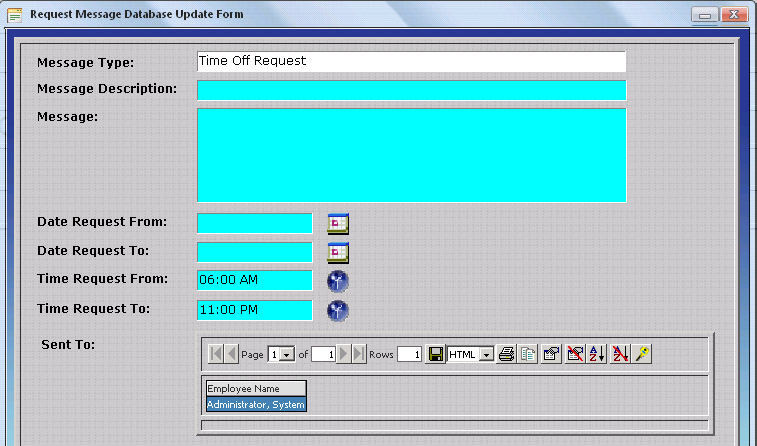
Default values will be automatically entered upon subsequent attempts to enter a record using the respective form. In this case, when users perform a Time Off Request the From Time and To Time will be automatically filled with the default values as shown.
Access to the InfiniTime Software Application can be limited by defining Valid IP Addresses. If Valid IP Addresses are defined InfiniTime will compare the IP Address of the user to the list of valid IP Addreses within InfiniTime. If the user's IP Address appears on the list, they will be granted access to the software after a successful login. Should the user's IP address be absent from the list they will be denied access to the InfiniTime Software. It should be noted that Valid IP Addresses can be specified for the entire company and for each individual employee. This gives the Software Administrator complete control over how the software is accessed from both the local area network and remote sites.
It is important to distinguish between access granted to the software through valid IP Addresses and Security Permissions which are defined by Security Roles. Valid IP Addresses define an employees ability to log into the software while security permissions define the actions an employee can perform within the software after they are logged in. For example, an Administrator has full control over all features and windows within the InfiniTime Software, even though an employee is assigned to the Administrator role within the Software they will still be unable to log into the software if the IP Address of their computer is not listed in either the Company or Employee Valid IP Addresses Table.
The validation process that occurs when an employee attempts to login to the InfiniTime Software has been altered to accommodate the use of Valid IP Addresses. When an employee attempts to login to the InfiniTime software several factors determine whether the employee will be granted access. The procedure is outlined below.
1.) The Login ID and Password entered by the employee must be correct.
2.) Entries in the Company Wide Valid IP Address table are compared to the IP Address of the user's computer. If the IP Address of the employee's computer matches an entry in the table, or if the Company Wide Valid IP Address table is blank the logon process will continue. Otherwise the employee will be denied access.
3.) The IP address of the employee's computer is compared to any entries in the Employee Specific Valid IP Address table. If the IP Address of the employee's computer matches an entry in the table, or if the Employee Specific Valid IP Address table is blank the login process will complete successfully and the software will load. Otherwise the employee will be denied access to the software.
When Valid IP Addresses are utilized employees will be unable to log into the software from any IP Address that is not listed in either the Company Valid IP Address table or the Employee Valid IP Address table. The only exception to this rule is when the Company Valid IP Address table has no IP addresses defined and some or all employees have Employee Specific Valid IP Addresses defined. In this situation access to the software will only be denied for those employees with Valid IP Addresses Specified in their employee record. All other employees can access the software from any location.
Valid IP Addresses are configured from within the Manager Module. To Access the Valid IP Address table for the company you must be logged in as an employee assigned to the Administrator Security role, or equivalent.


Using the Valid TCP/IP Address Update Form
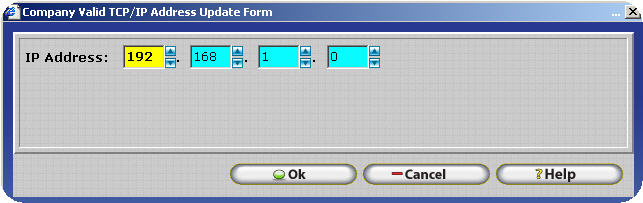
Clicking on insert will open the Valid TCP/IP Address Update form which can be used to specify the valid IP Address. It should be noted that TCP/IP Addresses are contrived of four octets. Each octet may not be less than zero (0) or greater than two hundred fifty five. (255) To insert a valid TCP/IP Address into the software enter the IP address into Update Form. For example, 192.168.1.0 would be added as shown below.
A list of frequently asked questions regarding the use and Configuration of Valid IP Addresses is listed below.
An IP Address is a unique numeric identifier for a specific computer or device, commonly referred to as a host, that is connected to the internet or a local area network. An IP Address can be thought of as something similar to a telephone number. They provide a way for other hosts or devices to communicate with or contact you. An IP Address is considered either public or private.
Private IP Addresses are only used internally within an office, home, or enterprise network. They are not known on the internet and cannot be used to communicate with other computers online. Private IP Addresses are assigned by your network administrator or dynamically assigned by a DHCP server. Dynamic Host Configuration Protocol (DHCP) refers to a set of rules used by a communication device to obtain Internet Addresses from a server. The Dynamic Host Configuration Protocol server keeps a list of addresses available for assignment and assigns them to network devices or hosts as needed.
Public IP Addresses are used to communicate on the internet and are made known to other hosts or devices. Public IP Addresses are assigned by your Internet Service Provider.
IP Addresses, both Public and Private, can be either static or dynamically assigned. Every time you connect to the internet your ISP will assign you a Public IP Address. If this Public IP Address is the same every time you connect to the internet then it is a Static IP Address. The ISP has reserved this address for your use only and will not lease it out to another device or computer on the internet. In order for a computer or device on the internet to be contacted on a regular basis by a remote device it must have a Static IP Address.
Keeping the example of a phone number in mind, if you constantly changed your phone number it would be impossible for others to contact you on a regular basis using the same phone number. This is the case for Dynamic IP Addresses. If your ISP Assigns you a different Public IP Address every time you connect to the internet then your Public IP Address is Dynamic. It is not possible to use Dynamic IP Addresses with the Valid IP Address feature of InfiniTime.
Private IP Addresses can also be static or dynamic. Dynamic IP Addresses are often used on local area networks in order to reduce the amount of manual configuration that must be performed by the Network Administrator. Dynamic IP Addresses are automatically assigned by a DHCP server on your local area network. Static IP Addresses must be manually configured by the Network Administrator or other Authorized Personnel with access to your network equipment.
It is possible to determine the IP Address assigned to any computer on a Windows Operating system by using the dos command IPCONFIG. The following steps will walk you through opening an dos prompt, using the IPCONFIG command, and reading the command's output. You must be at the machine to perform the steps outlined below. If you are still unsure after following this process please contact your Network Administrator for assistance.
Click on Start.
![]()
Click on Run.

Type cmd into the dialog box.
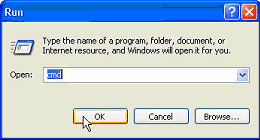
Click OK.
A dos window will open. Type ipconfig /all
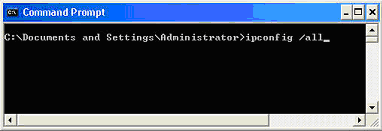
Hit enter. The network configuration of your server will be displayed.
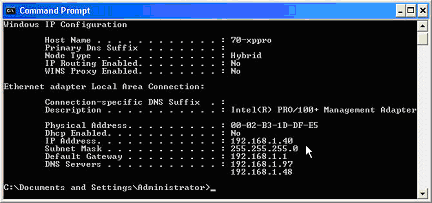
The InfiniTime 7.0 Server should have a static ip address. The results below indicate a static address of 192.168.1.40 with DHCP disabled.
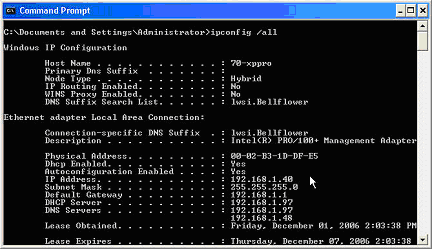
The results below show DHCP enabled. This means the computer has a dynamic IP Address assigned. The computer must be configured with a static Private IP Address in order to grant or limit access to it using Valid IP Addresses.
A variety of websites exist to assist internet users with identifying their Public IP Address. One such website is http://www.whatismyip.com. Simply browse to this website to identify your Public IP Address. The simplest way to determine if your Public IP Address is static is to contact your Internet Service Provider (ISP).
To determine your Public IP Address using www.whatismyip.com
Click on Start
![]()
Click on Run
Type www.whatismyip.com in the dialog box as shown.
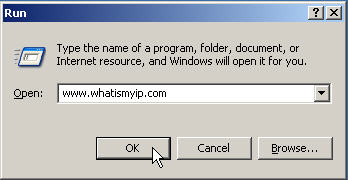
Click OK.
The website will open and display your Public IP Address on the home page.
Valid IP Addresses make it possible to restrict access to the InfiniTime Software Application from all computers, both local and remote, except those with an IP address that is defined as valid or authorized. This helps secure confidential employee information that may be contained within the InfiniTime Database by adding an extra layer of security to the application. Users must not only have valid login credentials but they must also be located at a machine with an IP Address that has been designated as valid by the InfiniTime Software Administrator.
Valid IP Addresses can also be used to restrict employee access to certain sites. A corporation with multiple sites may only want their employees to be able to clock in or out from work using the InfiniTime Software when they are at the office. Valid IP Addresses can be assigned to individual employees. Depending upon the configuration, this will allow the employee to access the software only from their desk or from any computer in the office. If the employee would attempt to access the software from any other machine they would be denied access.
Before deciding to use the Valid IP Address feature of InfiniTime you must understand how your software is deployed. Four deployment options are available for InfiniTime as outlined below.
Standalone InfiniTime Server
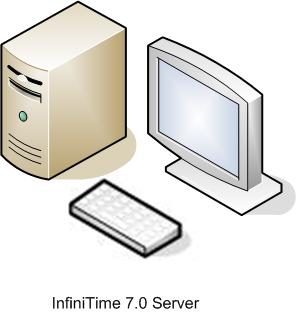
Standalone Installations require only a server. In a Standalone Installation the server hosts all InfiniTime files and information. The InfiniTime software can be viewed using a web browser in the same way it would be accessed on a Client machine. A stand-alone installation requires an Internet connection during installation for registration purposes only. After installation an Internet connection is not required for use of the software.
Valid IP Addresses can not be used to limit access in a standalone environment. The InfiniTime Server can not be restricted from accessing InfiniTime.
Onsite InfiniTime Server with On-Site Clients
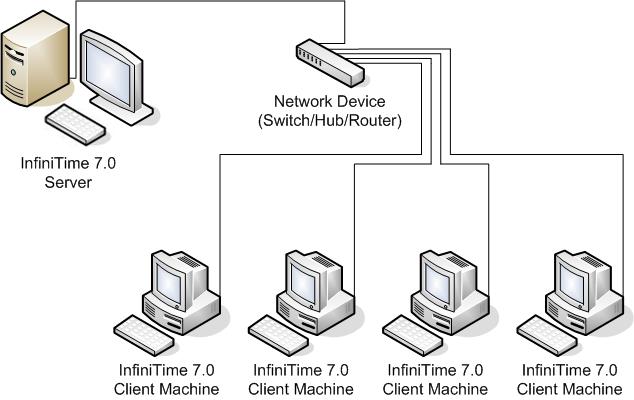
As shown, this server is connected to a Local Area Network and hosts the InfiniTime software for Client machines that are on the local network. Employees and Managers can access the software and all of its features from any computer on the network.
In this scenario Valid IP Addresses can be used to limit access to specific hosts on the local area network. This would be accomplished by retrieving the IP Address from each computer for which access is to be granted. This IP Address would then be configured in the Company or Employee Valid IP Address table to grant the desired level of access.
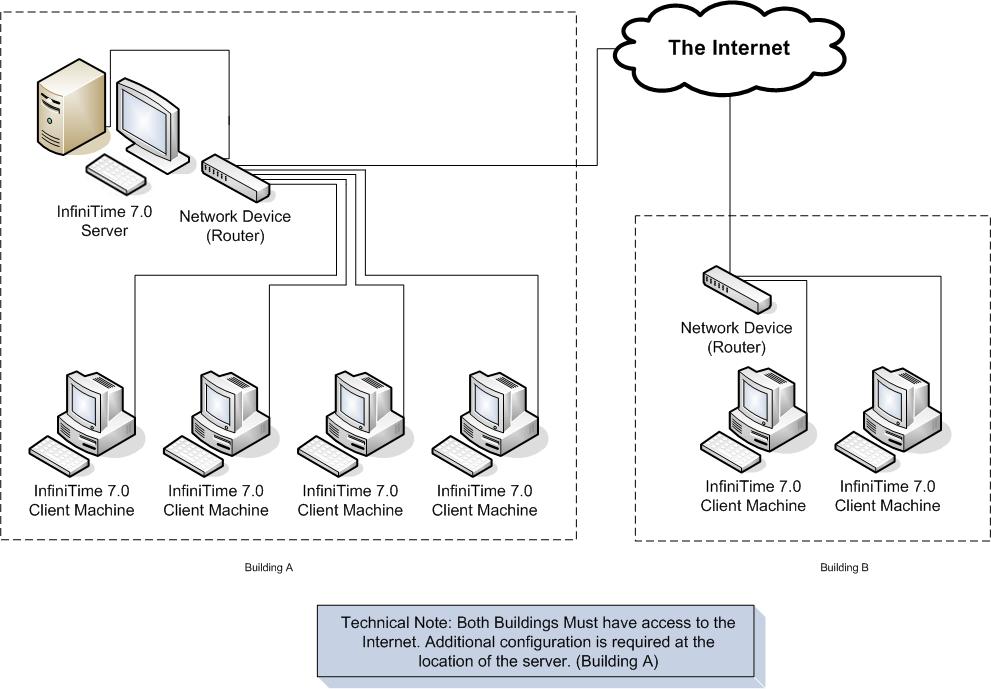
Onsite InfiniTime Server with Off-Site Clients
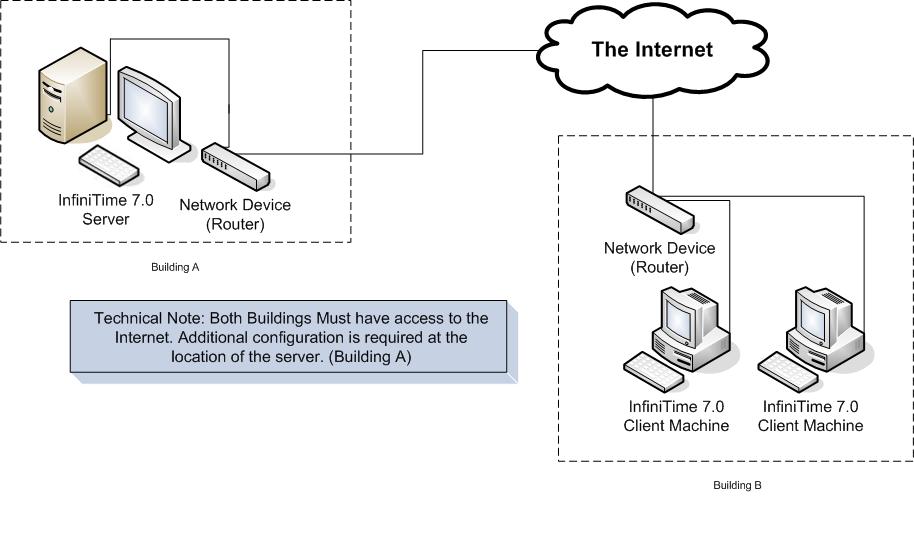
As pictured, this server has a Static ip address and uses an Internet service such as T1, DSL, or Cable to connect to the Internet. Any employee or affiliate armed with the proper web site address and their login information can log into the InfiniTime software in order to run the InfiniTime Labor Management Software. It is important to understand that there is no client software required to access the InfiniTime Application. Any computer connected to the internet with a web browser can be used to access the InfiniTime Software. Users must simply have valid login credentials and the proper web site address to access the InfiniTime Software on the server.
Valid IP Addresses make it possible to limit access to the InfiniTime server to specific remote sites. This is accomplished by defining a remote computer's Public IP Address as valid within the Company or Employee Valid IP Address Table to grant the desired level of access.
Onsite InfiniTime Server with On-Site and Off-Site Clients
Combining the first two options provides a versatile deployment alternative separating Web Applications from other software applications. Employees on the local network and abroad have full access to all of InfiniTime's features. Remote users need only a computer or laptop, an Internet connection, and their login information to connect to the InfiniTime software.
In this scenario Valid IP Addresses can be used to limit access to specific machines on the local area network and specific remote sites.
The Following steps should be completed before attempting to configure Valid IP Addresses:
InfiniTime features two methods of defining Valid IP Addresses in order to offer Software Administrators complete control over how the InfiniTime Software Application is accessed. Company Wide Valid IP Addresses are IP Addresses from which any employee can login to the InfiniTime Software. Employee Specific Valid IP Addresses are IP Addresses from which a specific employee will be granted access. The following configurations are available:
Company Wide Valid IP Addresses Only
The use of only Company Wide Valid IP Addresses will grant all employees access to the InfiniTime Software from any IP Address defined as valid within the Company Wide Valid IP Address table.
Employee Specific Valid IP Addresses Only
The use of only Employee Specific Valid IP Addresses will grant access to the InfiniTime Software from any location for employees that do not have Valid IP Addresses defined. Employees with Employee Specific Valid IP Addresses will only be able to login from hosts with an IP address designated as valid in the Employee Valid IP Address Table under their employee record.
Company Wide and Employee Specific Valid IP Addresses
The use of both Company Wide and Employee Specific Valid IP Addresses will grant access from the IP addresses defined by as valid by the Company Wide TCP/IP Address Table for any individual without Employee Specific Valid IP Addresses defined. Employees with Employee Specific Valid IP Addresses will only be able to login from hosts with an IP address designated as valid in the Employee Valid IP Address Table under their Employee Record.
It is important to note that the Employee Specific Valid IP Addresses override Company Wide Valid IP Addresses. For example if Valid IP Addresses were configured as shown below, Employee A would only be able to access the InfiniTime 7.0software from 10.1.1.64, even though 10.1.1.16, 10.1.1.32, and 10.1.1.48 are defined as Company Wide Valid IP Addresses. By defining employee specific Valid IP addresses you are instructing the software to grant access to that employee from ONLY those addresses specified in the Employee Specific Valid IP Address Table.
Company Wide Valid IP Addresses Employee A Valid IP Addresses
10.1.1.16 10.1.1.64
10.1.1.32
10.1.1.48
To grant access to all computers or hosts on a given subnet or network address, first identify the common digits of the IP address then fill the remaining portion of the IP address with zeroes.
For example:
To grant access to all computers with the IP Addresses of 192.168.1.1 to 192.168.1.255 first identify the common portion of the IP address.
192.168.1.1
192.168.1.255
The common portion of the IP Address is the first three octets or 192.168.1. Fill the remaining portion of the IP Address with zeroes. In this case, the address to be added to the Company Valid IP Address Table would be 192.168.1.0
InfiniTime features two methods of defining Valid IP Addresses in order to offer Software Administrators complete control over how the InfiniTime Software Application is accessed. Company Wide Valid IP Addresses are IP Addresses from which any employee can login to the InfiniTime Software. Employee Specific Valid IP Addresses are IP Addresses from which a specific employee will be granted access. Examples showing possible uses of Valid IP Addresses are provided below for each InfiniTime Software Deployment Option. Refer to the Valid IP Addresses Introduction & FAQ for general information regarding the use and configuration of Valid IP Addresses.
Onsite InfiniTime Server with Onsite Clients
In an environment where the InfiniTime Software is only used within the corporate or business network it is possible to limit access to meet a variety of goals. Regardless of whether you are looking to limit access to InfiniTime to specific departments, specific employees, or specific locations throughout the office the Valid IP Addresses feature is a powerful security tool providing the InfiniTime Software Administrator with complete control over how employees access the InfiniTime Software. Examples of commonly used scenarios where Valid IP Addresses can be applied in an Onsite Environment are provided below.
Company Wide Valid IP Addresses: Limiting Access to Specific Departments or Subnets
Valid IP Addresses can be used to limit software access to specific Departments or Subnets. The example below depicts an office building with two departments, Accounting and Phone Support. Valid IP Addresses are used to grant access to the Accounting Department and restrict access from all other computers on the network. All of the computers in the Accounting Department have an IP Address beginning with 192.168.10 while all of the computers in the Phone Support Department have an IP Address beginning with 192.168.20. To permit access to the InfiniTime software for a group of computers the common octets of an IP Address must be identified. To identify the common octets for a group of computers compile a list of all computers as shown below. To determine the IP Address which must be added to InfiniTime in order to grant access to all computers within the group identify the common octets and fill any remaining octets with zeroes. There is no limit to the amount of Valid IP Addresses that can be added to the InfiniTime Software. Multiple IP Addresses can be added to grant access to more than one group while excluding access to others.
Computer Name IP Address
Accounting Desktop 1 192.168.10.10
Accounting Desktop 2 192.168.10.11
Accounting Desktop 3 192.168.10.12
Accounting Desktop 4 192.168.10.13
Common Octets: 192.168.10
Final IP Address: 192.168.10.0

Through the use of Company Valid IP Addresses all employees will be granted access to the software from computers within the Accounting Department. Any employee that attempts to access the InfiniTime software on a computer outside of the Accounting department will be denied access to the software in the above scenario.
Company Wide Valid IP Addresses: Limiting Access to Specific IP Addresses or Computers
Valid IP Addresses can be used to limit software access to specific IP Addresses or Computers. The example below depicts an office building with two departments, Human Resources and Graphics. Valid IP Addresses are used to grant access to the HR Supervisor and the Graphics Supervisor. All other computers on the network will be denied access to the InfiniTime Software. There is no limit to the amount of Valid IP Addresses that can be added to the InfiniTime Software. Multiple IP Addresses can be added to grant access to as many IP Addresses as desired. Keep in mind any IP Addresses not specifically listed in the Company Wide Valid IP Address table will be denied access to the InfiniTime Software.
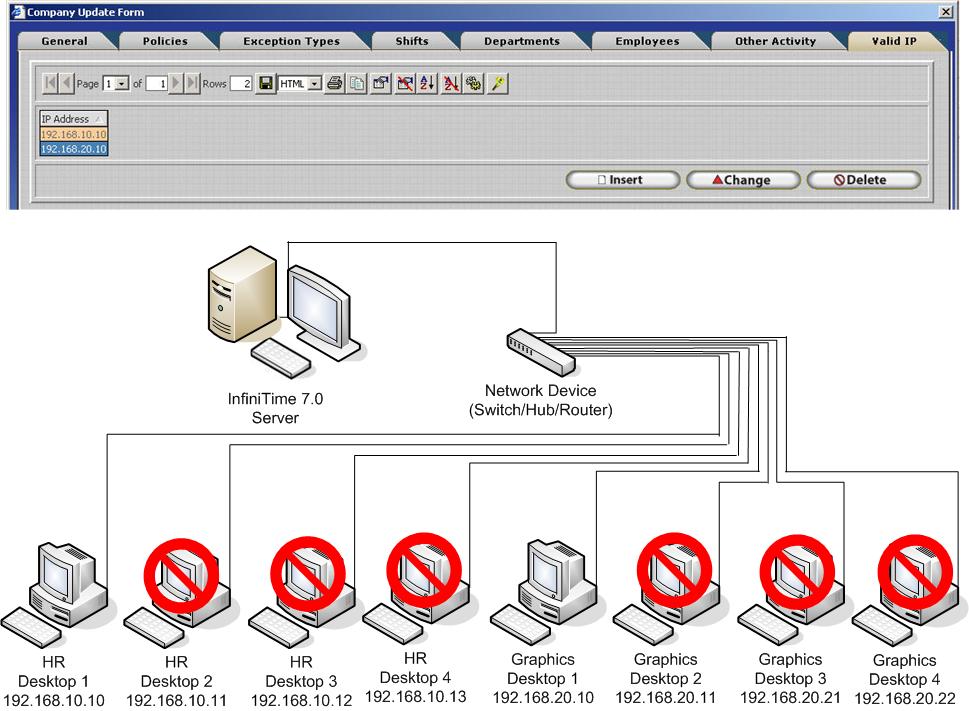
Through the use of Company Valid IP Addresses all employees will be granted access to the software from computers with IP Addresses that are listed in the Company Valid IP Address Table. In this example, this includes HR Desktop 1 and Graphics Desktop 1 which are both used by the Department Supervisors. Any employee that attempts to access the InfiniTime software on other computers within the building will be unable to access the software unless the IP Address of their computer is added to the Valid IP Addresses Table.
Employee Specific Valid IP Addresses: Limiting Employee Access to Specific IP Addresses
Employee Specific Valid IP Addresses can be used to limit employee access on an individual bases to specific IP Addresses or Computers. The example below depicts an office building with four desktop machines. Valid IP Addresses are used to grant access to each employee only at their own desktop. The Employee Specific Valid IP Address table, which is found on the login tab of the employee's record, is displayed under each employee's desktop. This shows the IP Address that has been added to each employees record in order to restrict their access to only their desktop. Keep in mind there is no limit to the amount of Valid IP Addresses that can be added to the InfiniTime Software. Multiple IP Addresses can be added to allow access for individual employees from additional computers. It is important to note that employees will be denied access from any IP Address not specifically listed in their Employee Specific Valid IP Address table once a single IP Address is entered into the Employee Specific Valid IP Address Table.
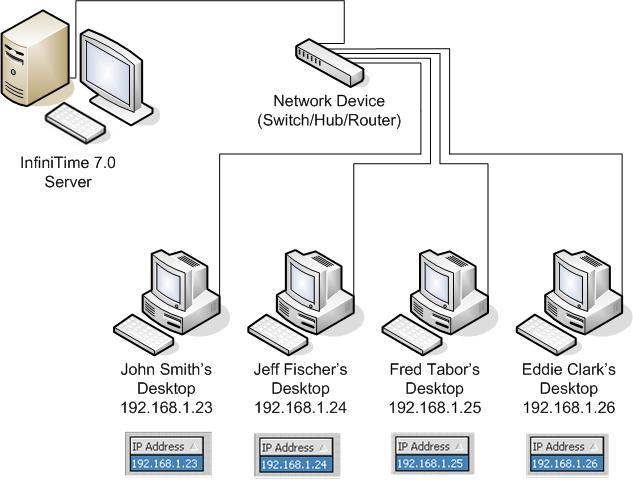
Through the use of Employee Specific Valid IP Addresses employee access can be limited to specific locations. In the example above the IP Address of each employee's desktop has been added to their Valid IP Address table. This causes the software to deny access if the employee would attempt to log in to the software from any computer on the local network other than their own desktop.
Employee Specific Valid IP Addresses: Limiting Employee Access to Specific Departments or Subnets
Valid IP Addresses can be used to limit software access to specific Departments or Subnets. The example below depicts an office building with two departments, Accounting and Phone Support. Valid IP Addresses are used to grant access to the computers within the Phone Support Department and restrict access from all other computers on the network. All of the computers in the Phone Support Department have an IP Address beginning with 192.168.20 while all of the computers in the Accounting Department have an IP Address beginning with 192.168.10. To permit access to the InfiniTime software for a group of computers the common octets of an IP Address must be identified. To identify the common octets for a group of computers compile a list of all computers as shown below. To determine the IP Address which must be added to InfiniTime in order to grant access to all computers within the group identify the common octets and fill any remaining octets with zeroes. There is no limit to the amount of Valid IP Addresses that can be added to the InfiniTime Software. Multiple IP Addresses can be added to grant access to more than one group while excluding access to others. Employee Specific Valid IP Addresses are configured for employees on an individual bases. With this in mind it is possible to configure Valid IP Addresses for some employees while leaving the default settings for other employees. As long as the Company Wide Valid IP Addresses are not configured employees without Employee Specific Valid IP Addresses will be able to access the software from anywhere.
Computer Name IP Address
Accounting Desktop 1 192.168.20.10
Accounting Desktop 2 192.168.20.11
Accounting Desktop 3 192.168.20.12
Accounting Desktop 4 192.168.20.13
Common Octets: 192.168.20
Final IP Address: 192.168.20.0
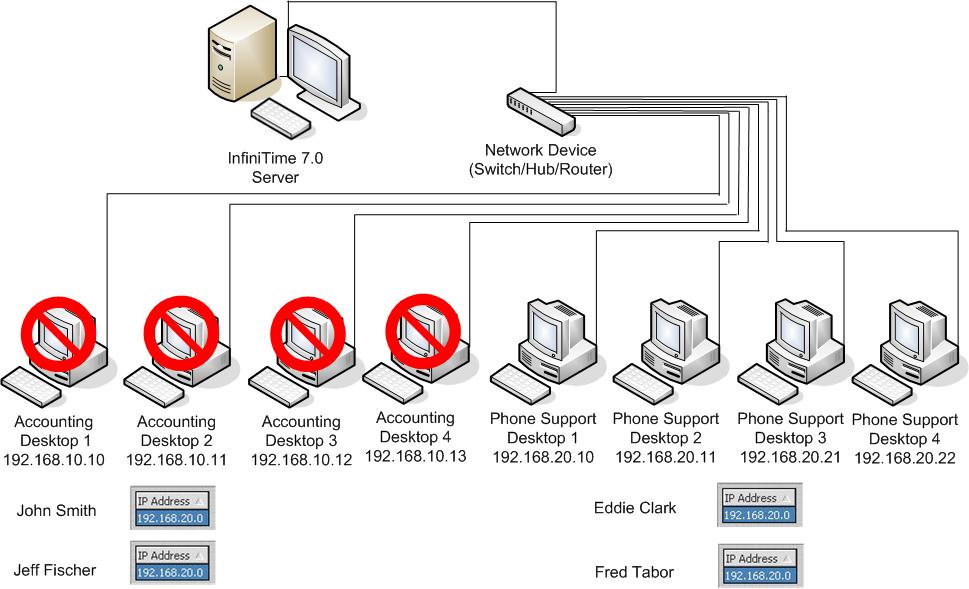
Through the use of Employee Specific Valid IP Addresses employees will be granted access to the software from computers within the Phone Support Department and denied access from other computers on the network as long as their Valid IP Addresses are configured appropriately as shown.
Onsite InfiniTime Server with Offsite Clients
Limit Access to Specific Remote Sites
Valid IP Addresses can be used to limit software access to specific IP Addresses or Computers. The example below depicts a company with multiple office buildings. Valid IP Addresses are used to grant access to all computers at Building B. Computers at all other remote sites will be denied access to the InfiniTime Software. There is no limit to the amount of Valid IP Addresses that can be added to the InfiniTime Software. Multiple IP Addresses can be added to grant access to as many remote sites as desired. Keep in mind any IP Addresses not specifically listed in the Company Wide Valid IP Address table will be denied access to the InfiniTime Software.
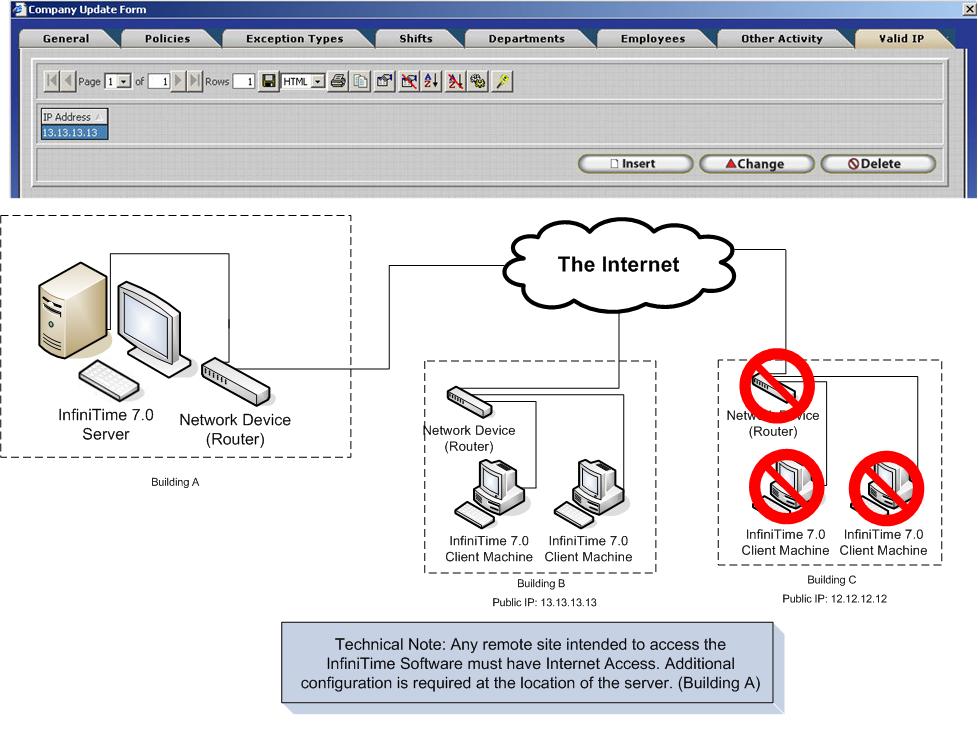
Through the use of Company Wide Valid IP Addresses all employees will be granted access to the software from computers at any remote site whose Public IP Address is listed in the Company Wide Public IP Address Table. Keep in mind the software will not be accessible from any remote site whose Public IP Address is not listed in the Company Wide Public IP Address Table. It is necessary to be present at, or have the ability to connect to, a computer that has a Valid IP Address in order to add or remove IP Addresses from the Company Wide or Employee Specific Valid IP Address tables. In the example shown the Public IP Address of computers at Building B has been added to the Valid IP Address Table. This grants access to all employees on any computer at Building B and denies access to any other remote computers.
Limit Employee Access to Specific Remote Sites with Omnipresent Administrator Access
Valid IP Addresses can be used to limit software access to specific IP Addresses or Computers. The example below depicts a company with multiple office buildings. Valid IP Addresses are used to grant access to all computers at Building B for specific employees only. Employees attempting to access the software at all other remote sites will be denied access. It is important to understand Employee Specific Valid IP Addresses are configured on an individual employee basis. In order to provide omnipresent access for employees with Administrative Rights the Employee Specific Valid IP Address table must be blank for that employee. In the example below Bob Emery is the Administrator. It should also be noted that the Company Wide Valid IP Address Table must be blank in order for Administrators to have omnipresent access to the software. Multiple IP Addresses can be added to grant access to as many remote sites as desired. Keep in mind employees will be denied access from all IP Addresses not listed in the Employee Specific Valid IP Address Table.
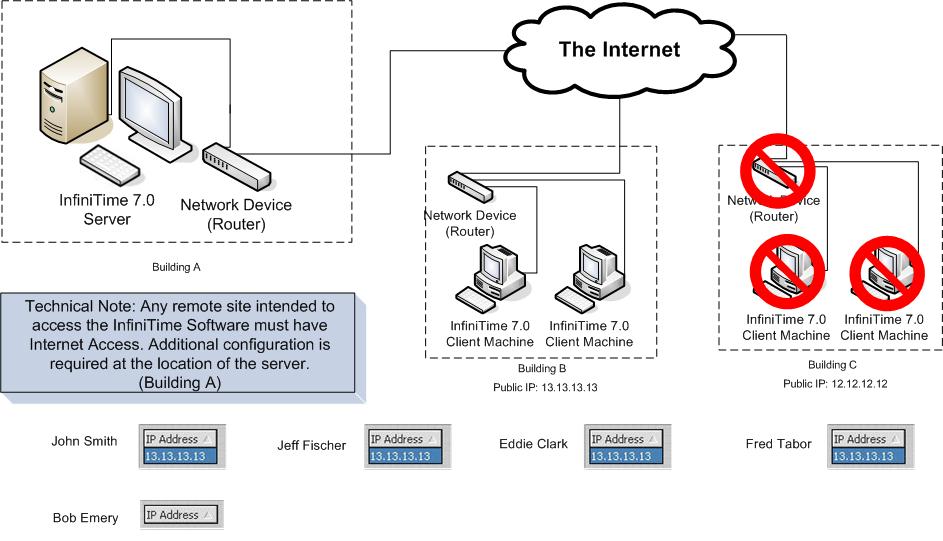
Through the use of Employee Specific Valid IP Addresses each employees will be granted access to the software from computers at any remote site whose Public IP Address is listed in the Employee Specific Valid IP Address Table under their Employee Record. In the example shown the Public IP Address of computers at Building B has been added to the Employee Specific Valid IP Address Table for each employee. This grants access to each employee whose Valid IP Addresses are configured for any computer at Building B and denies access to any other remote computers. Additionally Administrators can access the software from any location as long as the Company Wide Valid IP Address table is blank.
Onsite InfiniTime Server with Onsite and Offsite Clients
Omnipresence refers to the availability of the InfiniTime Software from any location with an Internet Connection and compatible web browser. This is accomplished by publishing the InfiniTime Web Site to the Internet. Once this task is performed, by default, the InfiniTime Software can be accessed from any location with an internet connection as long as the user has valid login credentials. Valid IP Addresses provide a valuable security option by making it possible to limit access to the InfiniTime software. Once Valid IP Addresses are configured, any local or remote user whose IP Address is not defined in either the Company Wide or Employee Specific Valid IP Address table will be denied access to the software. It is important to understand how adding a single Valid IP Address to the Company Wide Valid IP Address table effects software access. When an employee attempts to login to the InfiniTime software several factors determine whether or not the employee will be able to login. First the Login ID and Password entered by the employee must be correct. Once these are verified entries in the Company Wide Valid IP Address table are compared to the IP Address of the computer the user is located at. If the IP Address of the employee's computer matches an entry in the table, or if the Company Wide Valid IP Address table is blank the logon process will continue. Otherwise the employee will be denied access. Finally the IP address of the employee's computer is compared to any entries in the Employee Specific Valid IP Address table. If the IP Address of the employee's computer matches an entry in the table, or if the Employee Specific Valid IP Address table is blank the login process will complete successfully and the software will load. Otherwise the employee will be denied access to the software.
If omnipresence is desired the Company Valid IP Address Table must be left blank. This will allow users to access the software from any location, both local or remote, as long as their Employee Valid IP address table is blank. If desired access for specific employees can be limited to specific local or remote locations using the Employee Valid IP Address table.
Limit Employee Access to Specific Onsite Computers and Remote Sites with Omnipresent Administrator Access
In order to allow omnipresent access for Administrative Employees the Company Wide Valid IP Address table must be left blank. In this scenario the Employee Valid IP Address table will be used to limit access for all employees. It should be noted that new employees added to the system after the initial configuration of Valid IP Addresses will need to have the Employee Specific Valid IP Addresses defined in their employee record or they will be able to access the software from anywhere, including their homes computers. This is undesirable in large environments where it may go unrecognized if employees punch in or out after leaving the office from a remote computer.
The image below depicts a company with multiple office buildings and remote employees. InfiniTime Software Administrators and Payroll Clerks are allowed to access the software from any location with an internet connection in order to edit employee activity, access employee information, and run payroll. Onsite access is restricted to employees in the Human Resources Department while remote access is restricted to company buildings only to prevent employees from accessing the software at home. Refer to the Omnipresent Access: Overview section of this document for additional Information on Omnipresent Access.
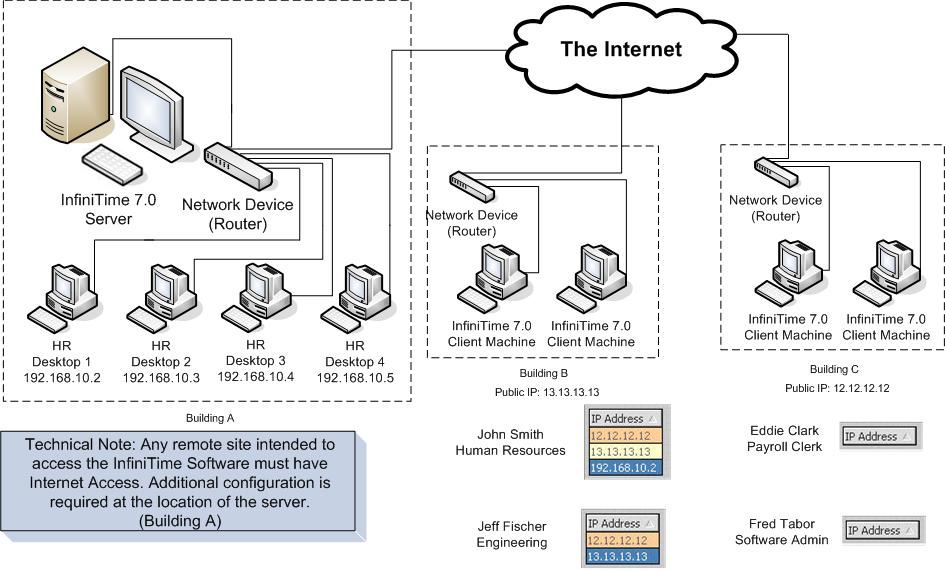
Through the use of Employee Specific Valid IP Addresses employees with Valid IP Addresses configured as those shown for Jeff Fischer will be granted access to the software from both Building B, and building C. Those without Employee Specific Valid IP Address configured, such as Eddie Clark and Fred Tabor, will be able to access the InfiniTime Software from any location with an internet connection. Local IP Addresses can also be added to the Employee Specific Valid IP Address Table to grant access for onsite computers as shown for John Smith, who is granted access to the InfiniTime Software. Keep in mind it is possible to use common octets in order to permit access from only specific departments or subnets on the local network. Refer to the example entitled "Limiting Employee Access to Specific Departments or Subnets" for more information on this technique.
In some cases, it may not be desirable for employees to be able to execute reports to view their timecard records, schedules, and / or accrual details on demand from the Employee Module. InfiniTime permits the InfiniTime Administrator to assign different reports to the buttons on the Employee Module Toolbar or disable the buttons entirely. Details are provided below.
The Employee Module Toolbar includes three buttons which employees can use to print reports. By default, these buttons are configured as follows:
Print Timecard - Prints the Timecard Detail Report for the respective employee. The Employee may select the date range.
Print Schedule - Prints the Postable Schedule Report for the respective employee. The Employee may select the date range.
Print Accruals - Prints the Employee Accruals Report for the respective employee which displays the employee's Accrual Totals.

To completely disable access to Reports from the Employee Module, simply uncheck the 'Print from Employee Module...' option for the Timecard Detail Report, Postable Schedule Report, and Employee Accruals Report as shown below.


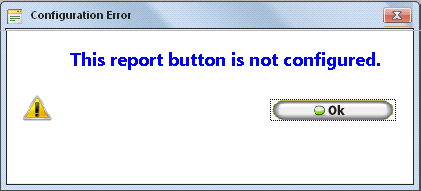
With these options unchecked, the Print Timecard, Print Schedule, and Print Accruals Buttons within the Employee Module will simply show the warning below indicating that there is no report assigned to the button..
To change which reports employees may quick print from the Employee Module, first uncheck the 'Print from Employee Module..' for the default report (Timecard Detail Report, Postable Schedule Report, or Employee Accruals Report) then check the appropriate 'Print from Employee Module...' to assign a report to the desired Employee Module Button. Steps are provided below using the Timecard Button as an example.
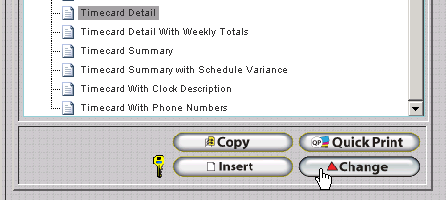
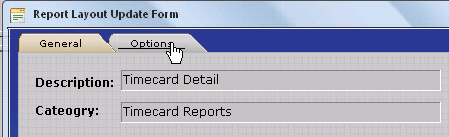
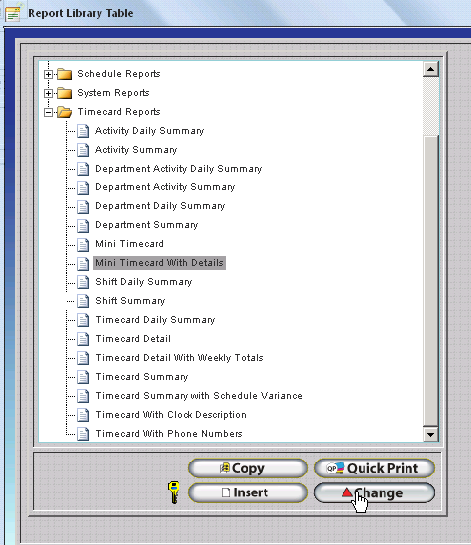
Locate the report you wish to assign to the Print Timecard Button. This document will use the Mini Timecard with Details for example purposes.
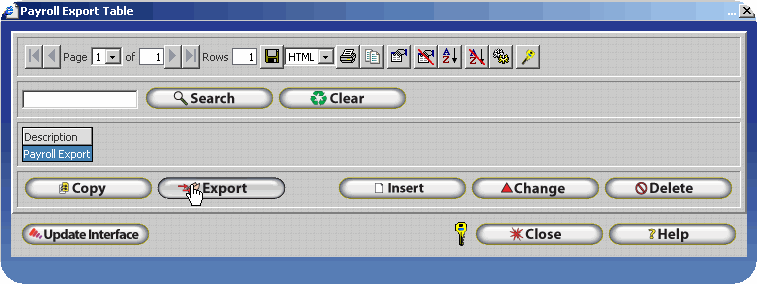
Click on the Report to select it and then click Change.
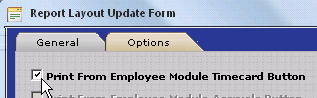
Click on the Options Tab and check the option titled 'Print From Employee Module Timecard Button'.
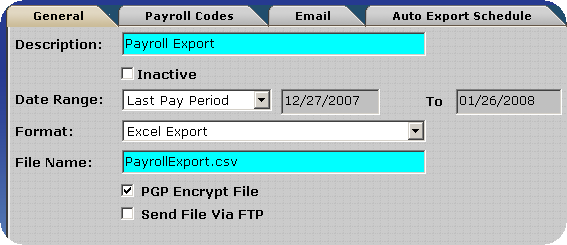
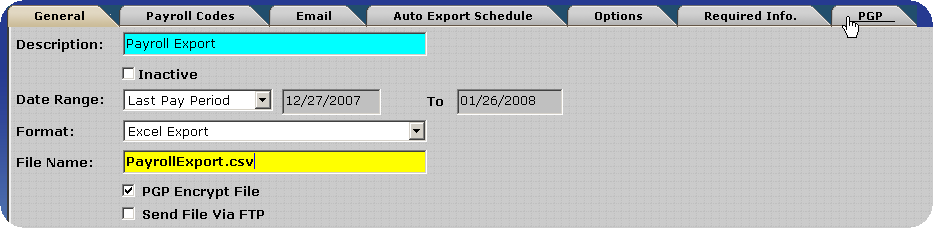
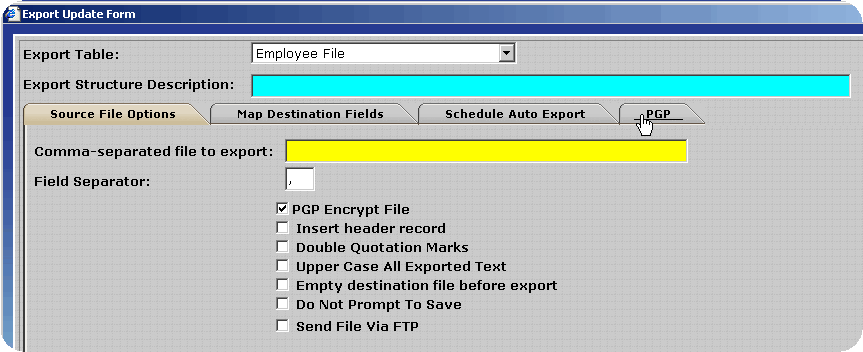
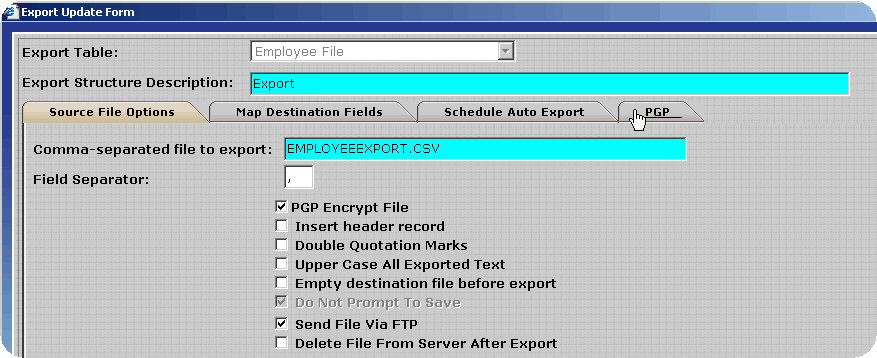
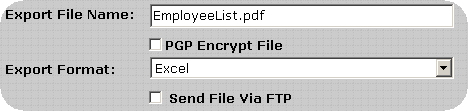
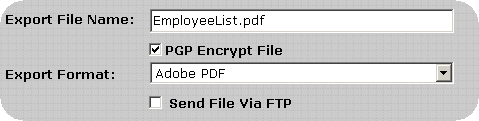
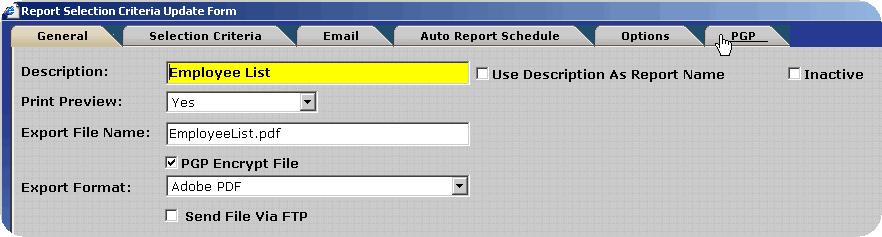
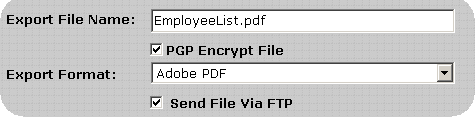
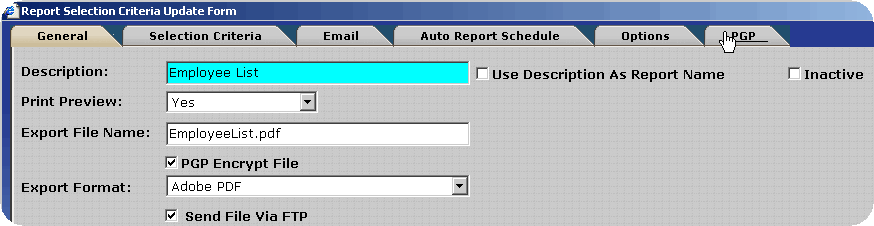
In order to provide maximum security for sensitive information such as employee demographics and banking information, an encryption algorithm has been integrated into the InfiniTime Software. PGP includes an extensive suite of encryption tools featuring a combination of public key and conventional cryptography providing improved security without a decrease in performance or usability. PGP can be used across unsecure networks to secure data from access by unauthorized users. With the integration of PGP all files entering and exiting the InfiniTime environment can be encrypted to safeguard sensitive information. Details on the configuration and use of PGP for all of the supported file types can be found below.
Technical Note: This document assumes the user has previous experience with the PGP Encryption Algorithm and has a PGP Client Available. Instructions are provided for using Keys, both public and private, provided by the user. A basic knowledge of the use and configuration of the user's PGP Client are assumed. InfiniTime supports the full feature set of the PGP Encryption algorithm through the use of Public Keys, Private Keys, and Passphrases. It should be noted that not all PGP Clients require all three levels of security. It is the users responsibility to configure PGP for use with their individual PGP Client. Inception Technologies does endorse or support the use and configuration of any specific PGP Client application.
The configuration and use of PGP varies according to the output method used. Three output methods are available for use with the InfiniTime Application. Payroll Export files can be emailed, exported and retrieved from the InfiniTime FTP Output, or sent via FTP to a remote FTP site. Examples for the configuration and use of PGP are arranged below according to the Output format used.
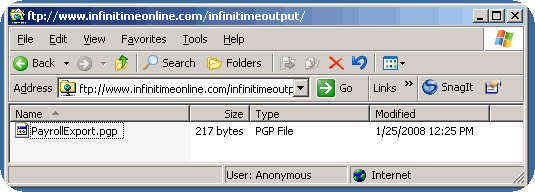
InfiniTime FTP Output - PGP Configuration
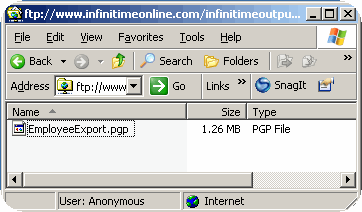
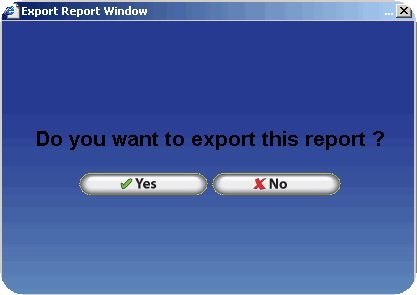
When it is not desirable to send a Payroll File via Email or FTP the file can be made available for download from the InfiniTime Output FTP site in a secure format. It should be noted that anyone with internet access who knows the web address used to access the FTP site can access it if InfiniTime has been published to the internet. This could permit unauthorized users to access payroll export files. Users should retrieve encrypted files immediately from the InfiniTime Output FTP Site and delete them from the public FTP site afterwards.

Transferring Payroll Export Files via FTP - PGP Configuration
To decrease the likelihood of unauthorized access to the encrypted payroll export files InfiniTime can place the files directly on a user specified FTP site. The user must supply connection details for the FTP Site, which InfiniTime will utilize in order to logon to the FTP during the export process. An example configuration is outlined below.
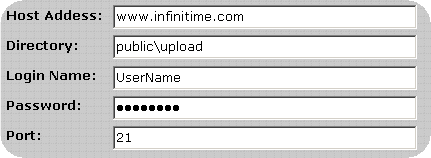
If you should experience any difficulties when attempting to send a Payroll Export via FTP verify the FTP login, password, port, directory and host address specified are correct.
Emailing Payroll Export Files - PGP Configuration
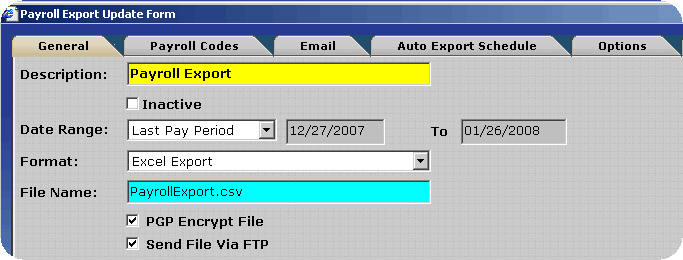
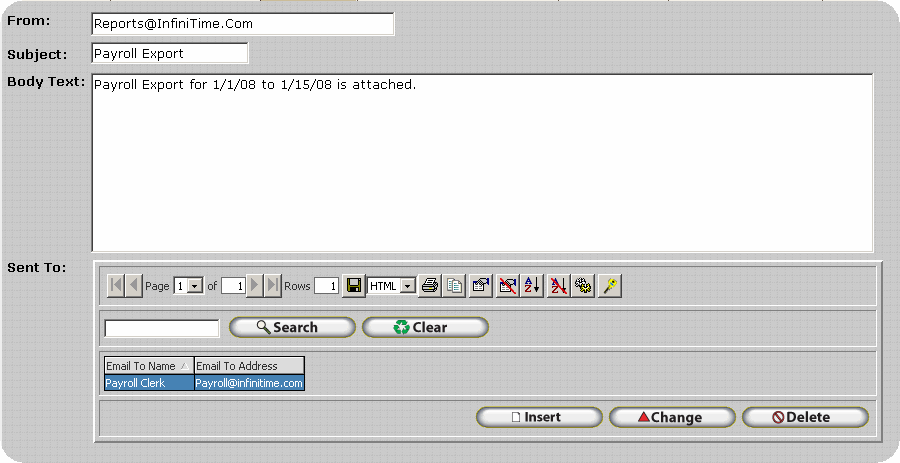
InfiniTime can also email Payroll Export files. Depending upon the configuration Payroll Export files can be sent to a single or multiple recipients at once. An example configuration is shown below.
If you should experience any difficulties when attempting to email a Payroll Export verify the items below are configured properly. Refer to the SMTP Configuration and Troubleshooting document for more information.
The InfiniTime Server must have an active Internet connection.
Power Management must be disabled on the Network Interface Card of the InfiniTime Server.
The InfiniTime Housekeeping Service must be started and running.
The InfiniTime Server does not need to have a user logged into the console. However, it must at least be powered on and idle at the Windows Login Splash Screen.
A printer must be installed on the InfiniTime Server.
A printer must be set as the default printer.
The Print Spooler Service must be started and running on the InfiniTime Server.
Your fully qualified domain name may need to be configured in the advanced delivery options of the SMTP Virtual Server created by InfiniTime depending on your domain policies.
An auto schedule must be configured within a saved report setting.
A destination name and email address must be defined on the email tab of the saved report setting.
The configuration and use of PGP varies according to the output method used. Three output methods are available for use with the InfiniTime Application, however only two are supported for use with General Export Files. Export files can be exported and retrieved from the InfiniTime FTP Output, or sent via FTP to a remote FTP site. Examples for the configuration and use of PGP are arranged below according to the Output format used.
InfiniTime FTP Output - PGP Configuration
When it is not desirable to send an Export File via Email or FTP the file can be made available for download from the InfiniTime Output FTP site in a secure format. It should be noted that anyone with internet access who knows the web address used to access the FTP site can access it if InfiniTime has been published to the internet. This could permit unauthorized users to access export files. Users should retrieve encrypted files immediately from the InfiniTime Output FTP Site and delete them from the public FTP site afterwards.
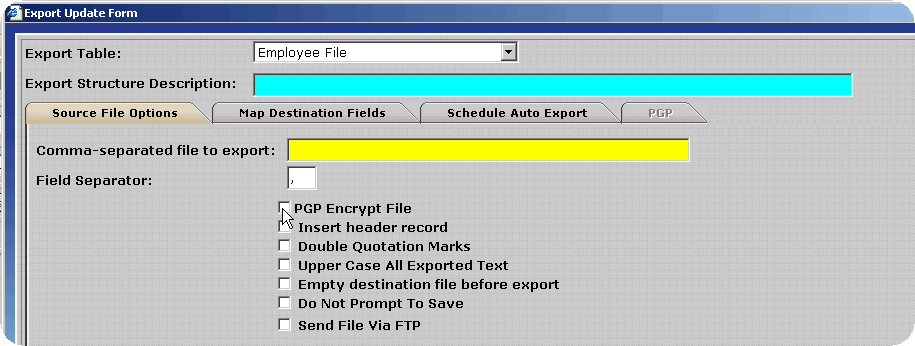

Transferring Export Files via FTP - PGP Configuration
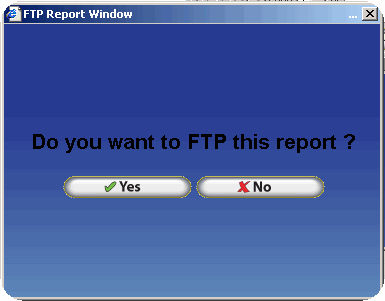
To decrease the likelihood of unauthorized access to the encrypted export files InfiniTime can place the files directly on an FTP site. The user must supply connection details for the FTP Site, which InfiniTime will utilize in order to logon to the FTP during the export process. An example configuration is outlined below.
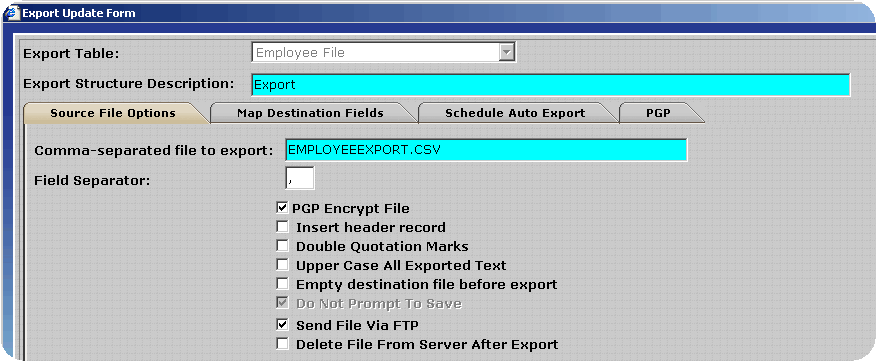
Several fields will be displayed for the entry of FTP information. Enter the information for the destination FTP site in the format shown below. Keep the following details in mind:
If you should experience any difficulties when attempting to send an Export via FTP verify the FTP login, password, port, directory and host address specified are correct.
The configuration and use of PGP varies according to the output method used. Three output methods are available for use with the InfiniTime Application. Report files can be emailed, exported and retrieved from the InfiniTime FTP Output, or sent via FTP to a remote FTP site. Examples for the configuration and use of PGP are arranged below according to the Output format used.
InfiniTime FTP Output - PGP Configuration
When it is not desirable to send a Report via Email or FTP the file can be made available for download from the InfiniTime Output FTP site in a secure format. It should be noted that anyone with internet access who knows the web address used to access the FTP site can access it if InfiniTime has been published to the internet. This could permit unauthorized users to access report files. Users should retrieve encrypted files immediately from the InfiniTime Output FTP Site and delete them from the public FTP site afterwards.

Transferring Report Files via FTP - PGP Configuration
To decrease the likelihood of unauthorized access to the encrypted report files InfiniTime can place the files directly on an FTP site. The user must supply connection details for the FTP Site, which InfiniTime will utilize in order to logon to the FTP during the export process. An example configuration is outlined below.
Several fields will be displayed for the entry of FTP information. Enter the information for the destination FTP site in the format shown below. Keep the following details in mind:
If you should experience any difficulties when attempting to send a Payroll Export via FTP verify the FTP login, password, port, directory and host address specified are correct.
Emailing Report Files - PGP Configuration
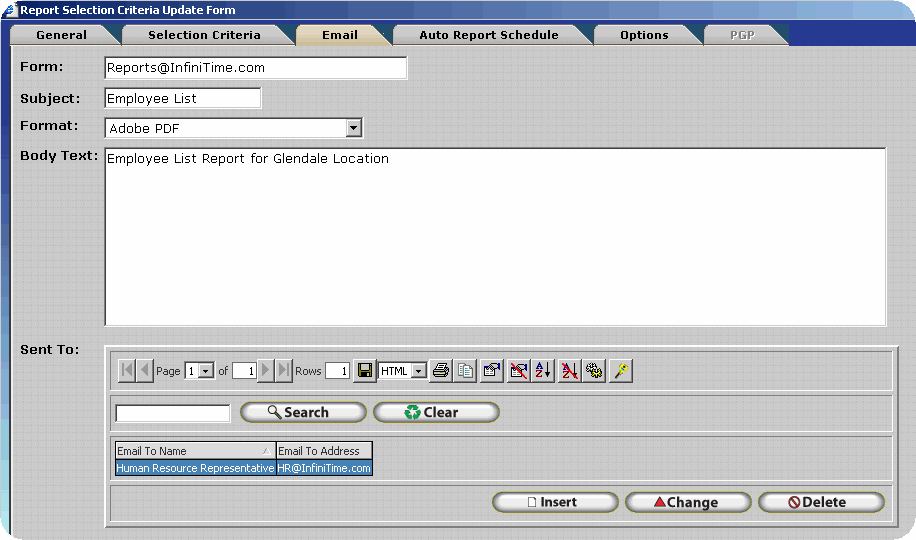
InfiniTime can also email report files in PDF, Excel, Word, and Rich Text formats. Depending upon the configuration reports can be sent to a single or multiple recipients at once. If desired automatic reports can be configured to email report files in the pgp encrypted format at certain times of the day. Refer to Chapter 10 - Auto Reports for more information.

If you should experience any difficulties when attempting to email a Payroll Export verify the items below are configured properly. Refer to the STMP Email Setup and Troubleshooting Document for more information.
The InfiniTime Server must have an active Internet connection.
Power Management must be disabled on the Network Interface Card of the InfiniTime Server.
The InfiniTime Housekeeping Service must be started and running.
The InfiniTime Server does not need to have a user logged into the console. However, it must atleast be powered on and idle at the Windows Login Splash Screen.
A printer must be installed on the InfiniTime Server.
A printer must be set as the default printer.
The Print Spooler Service must be started and running on the InfiniTime Server.
Your fully qualified domain name may need to be configured in the advanced delivery options of the SMTP Virtual Server created by InfiniTime depending on your domain policies.
An auto schedule must be configured within a saved report setting.
A destination name and email address must be defined on the email tab of the saved report setting.
The server must be granted permissions to relay email through the SMTP Virtual Server installed by InfiniTime.
The first step to properly configuring InfiniTime for use with your PGP Client Software is to understand the basics of cryptography and the configuration of your PGP Client Software. Be sure to read any documentation supplied with your PGP Client software. PGP Desktop, a common PGP client designed and made available by the creator of PGP is available from www.pgp.com as a 30 day trial for free. This PGP client includes complete documentation detailing the basics of cryptography and a quick start guide for the use of PGP Desktop. While these documents are useful as general knowledge regarding the use and configuration of PGP, more so if you are using PGP Desktop as your client, they may not be directly relevant if you are using a different PGP Client. It is important to read any manuals included with your specific PGP client as many do not support all levels of security offered by the PGP algorithm.
InfiniTime Keys
In order for you or your intended recipients to decrypt files encrypted in the PGP format by InfiniTime the supplied Private Key must be added to the keyring of your PGP Client. Please refer to the documentation supplied with your PGP Client for instructions to add a private key to your keyring. In general, there are two types of keys used with PGP Encryption, a public key and a private key.
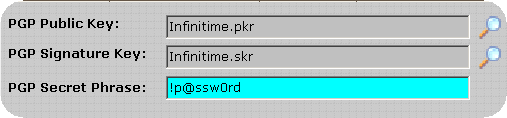
Public Keys: Public Keys can be distributed freely to individuals who will be sending you encrypted messages. A Public Key is used to encrypt messages that can only be decrypted by its associated private key in addition to verifying your signature. Within InfiniTime Public Keys are referred to as "PGP Public Keys."
Private Keys: Private Keys and their associated Passphrase should be kept private. If an individual should obtain your private key and the respective passphrase they can read your messages and impersonate you to others. A private key is used to decrypt incoming messages that were encrypted using your Public key, in addition to signing outgoing messages. Within InfiniTime Private Keys are referred to as "PGP Signature Keys."
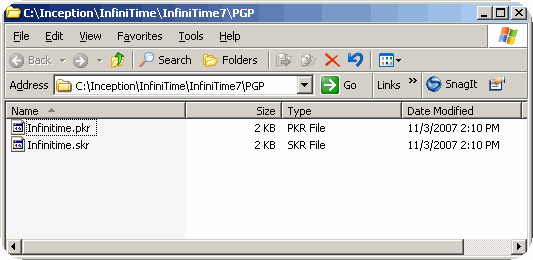
If the default installation settings were used, the PGP Keys can be found on the InfiniTime Server under C:\Inception\InfiniTime7\PGP\ as shown below.
To use your own keys with InfiniTime you must change the PGP Configuration within the InfiniTime Software Application. Before attempting to configure PGP Settings within InfiniTime please ensure you have exported your key to a file. InfiniTime offers three levels of secure PGP encryption, and it is important to understand each in order to decide which will work best in your company's environment.
Technical Note: When choosing Keys it is important to keep the recipient in mind. Private keys are generally not shared between different corporations or individuals as anyone with access to a private key can impersonate the owner and decrypt files that may be meant for only the owner to see. An individual's public key however is shared and can be distributed freely. You must receive the public key from an individual in order to encrypt files in a format they can receive and decrypt. An alternative is to use the default keys provided with InfiniTime, as these can be distributed freely. While the files will be encrypted in a secure format when using the default InfiniTime Keys, it must be understood that there is a larger group of people who have access to the InfiniTime Private Key when compared to using user generated keys where the Private Key is only available to one or at most a small group of people in a single company. The default InfiniTime Keys are distributed publicly to all InfiniTime 7 Customers.
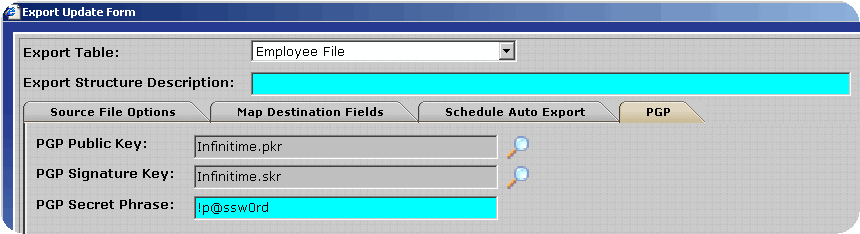
After enabling PGP click on the PGP Tab. The default InfiniTime PGP Keys are displayed.

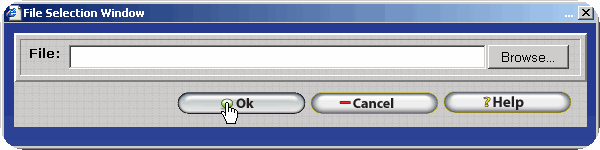
Click on the Magnify Glass to the right of the Signature key to bring up the File Selection Form.

Leave the field blank and click OK to clear the PGP Signature Key.
Clear the PGP Secret Phrase.
Click OK to save the changes.
![]()
After enabling PGP click on the PGP Tab. The default InfiniTime PGP Keys are displayed.
Clear the PGP Secret Phrase.
Click OK to save the changes.
![]()
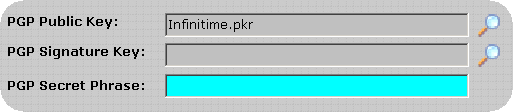
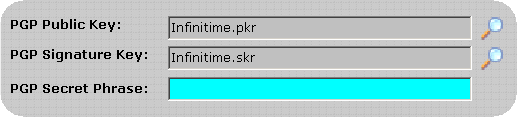
After enabling PGP click on the PGP Tab. The default InfiniTime PGP Keys and passphrase are displayed.
If desired, the keys and passphrase can be altered using the Magnify Glass Icons to select Public and Private keys provided by the user.
The following websites provide additional information and links to alternate PGP Clients.
International PGP Homepage: www.pgpi.org
InfiniTime Escort permits the InfiniTime Software Administrator to design customized portals to the InfiniTime Application using a drag and drop interface. Images, Web Links, Clip Art, Text Labels, Reports, and buttons to access individual sections of the InfiniTime Software can be added to User designed Escort Windows. InfiniTime Escort provides the InfiniTime Software Administrator to:
Create a customized software interface for specific user groups.
Limit exposure to the InfiniTime User Interface for non-technical users and / or individuals with minimal computing skills through use of a customized software interface.
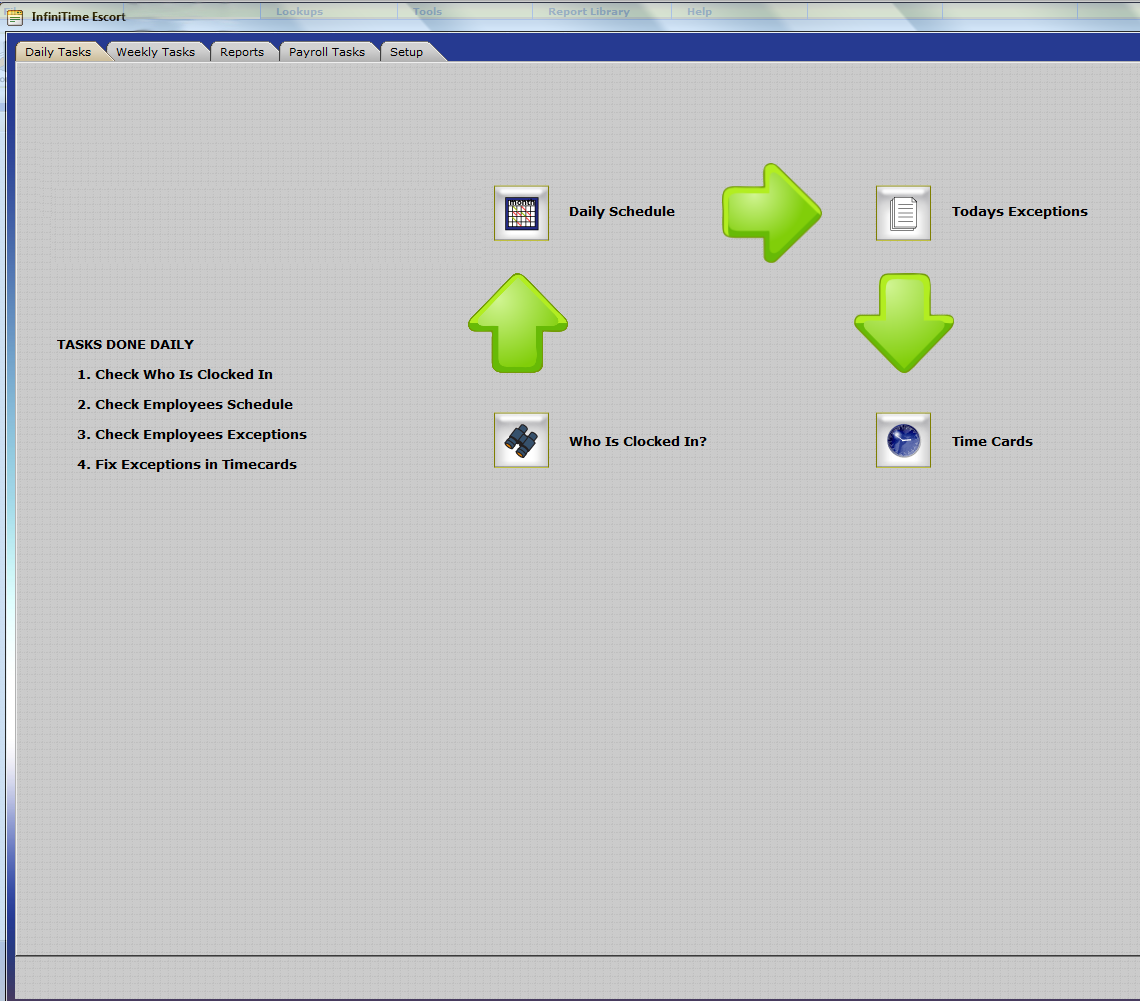
An example Escort Window showing a Daily Workflow is provided below. Additional details on how to design and configure Escort Windows are provided in the InfiniTime Escort Section of this document.
It is important to recognize that InfiniTime Security Roles include an initial configuration as outlined below. Individual users must be assigned to the appropriate security role during initial setup in order to limit access as appropriate. Your organization may require additional security roles or slight alterations to existing configuration in order to best meet the needs of your specific users.
Administrator: The administrator security role includes complete privileges to the software. Employees assigned to this role can edit software security and configure the grid. Employees assigned to the administrator security role have complete access to the InfiniTime software. The administrator security role cannot be edited.
Payroll Clerk: The payroll clerk security role includes complete privileges to the software. By default, employees assigned to this role have complete access to the InfiniTime software. Unlike the employee’s assigned to the administrator role, those assigned to the Payroll Clerk security role do not have the ability to edit software security or configure the grid. Security permissions granted by the payroll clerk security role can also be edited to suit the users needs.
Supervisor: The supervisor security role is intended for employee managers. Employee’s assigned to the supervisor role have the ability to view all information within InfiniTime though, by default, they are unable to alter information within the software. Supervisors are unable to edit software security or configure the grid.
Employee: The employee security role is intended for employees. Employees assigned to this role have minimal software access from within the Manager Module and are only able to view their own information via the Employee Module. Employees are unable to edit software security or configure the grid.
After initial software configuration, the Administrator Security Role should be used with care. It is recommended that InfiniTime Administrators utilize the Payroll Clerk security role after the initial software configuration has been performed. This will reduce the likelihood of accidental changes to software settings. Furthermore, it is recommended that each InfiniTime Installation have only one - at most two - users with Administrative Access. This ensures consistent configuration and prevents users from simply changing system configuration rules such as Policies, Holidays, Etc.